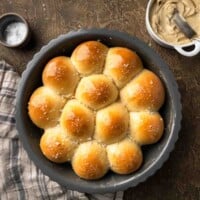


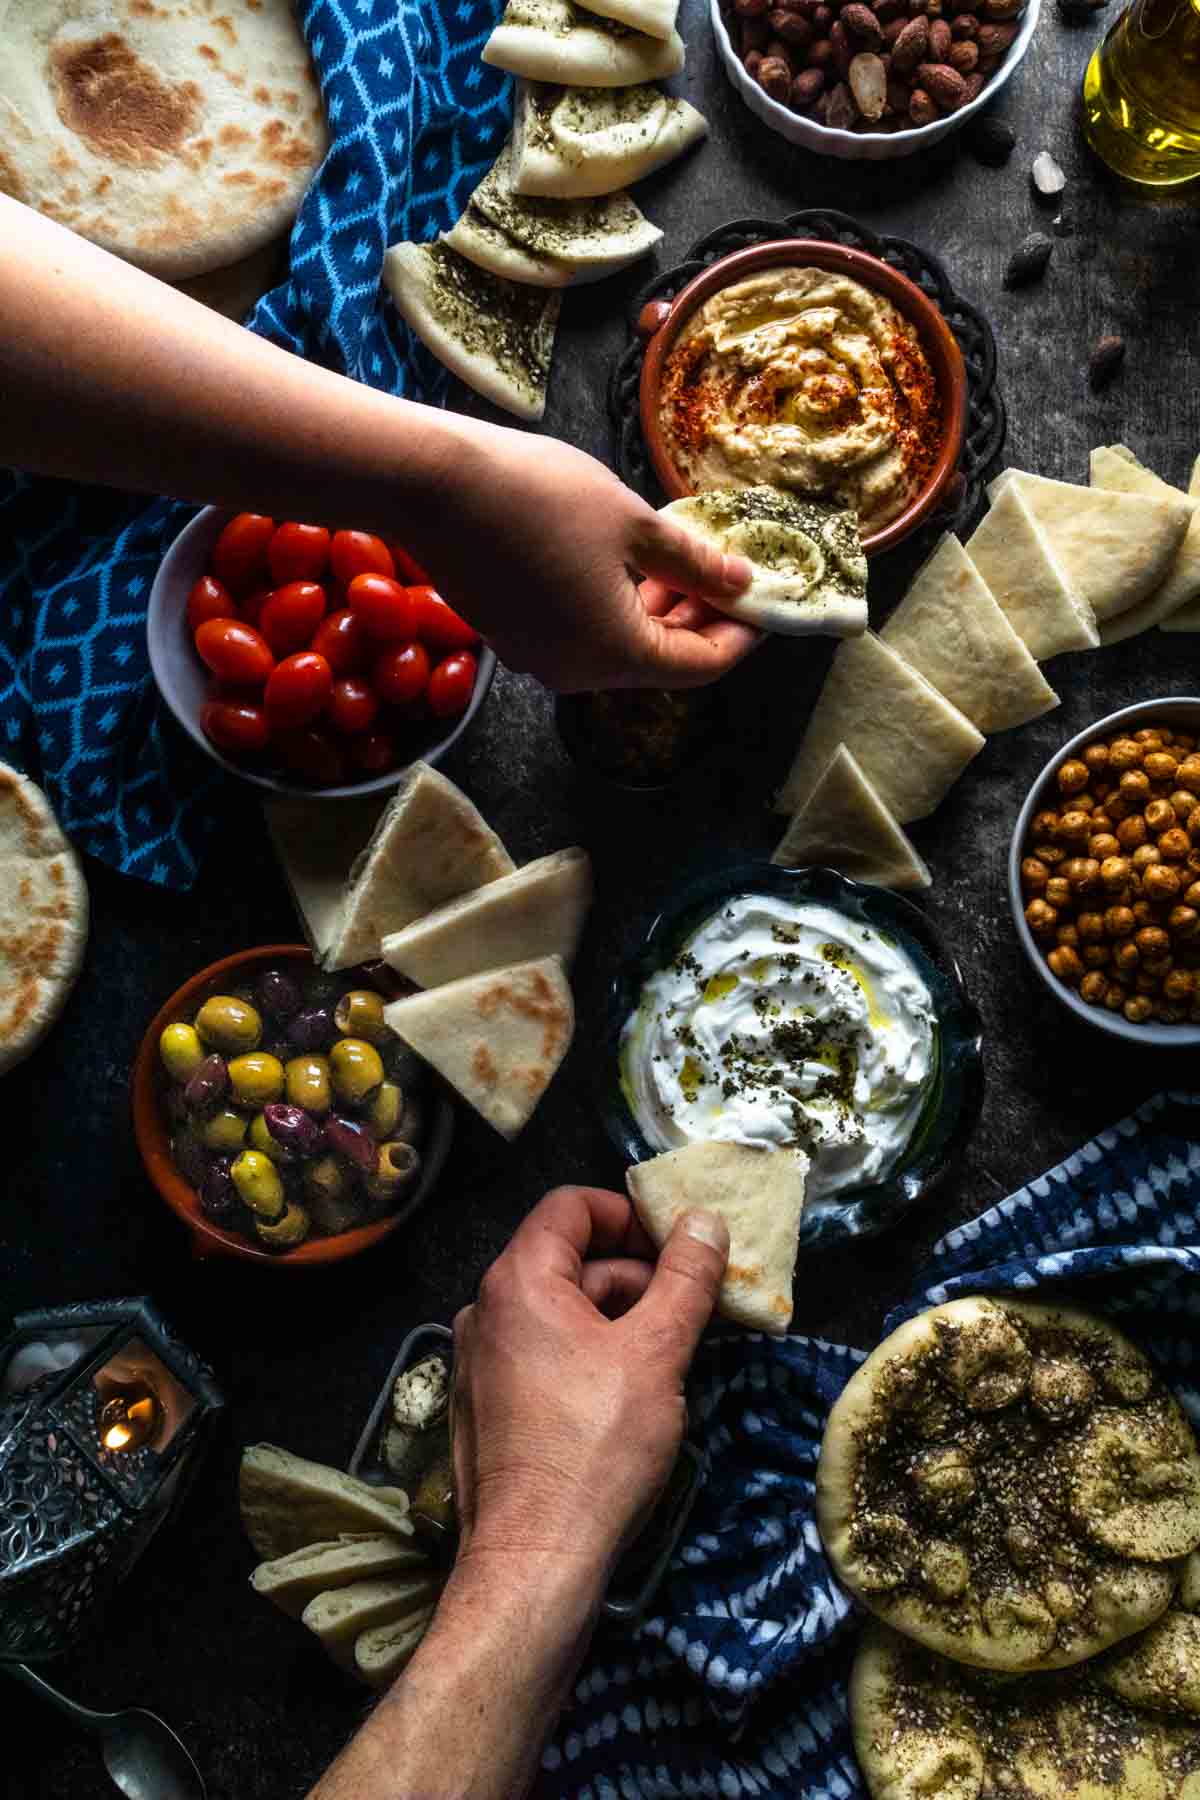
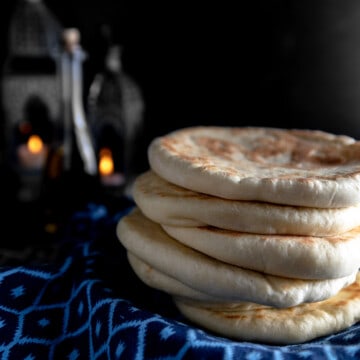
Pita bread is the perfect, soft, fluffy companion for dozens of meals and cuisines. Pita bread is simple to make and requires just a few, staple ingredients. This naturally vegan flatbread is great for dipping into hummus, adorning mezze platters, wrapping a gyro sandwich, or sopping up warm, spiced soups and stews.
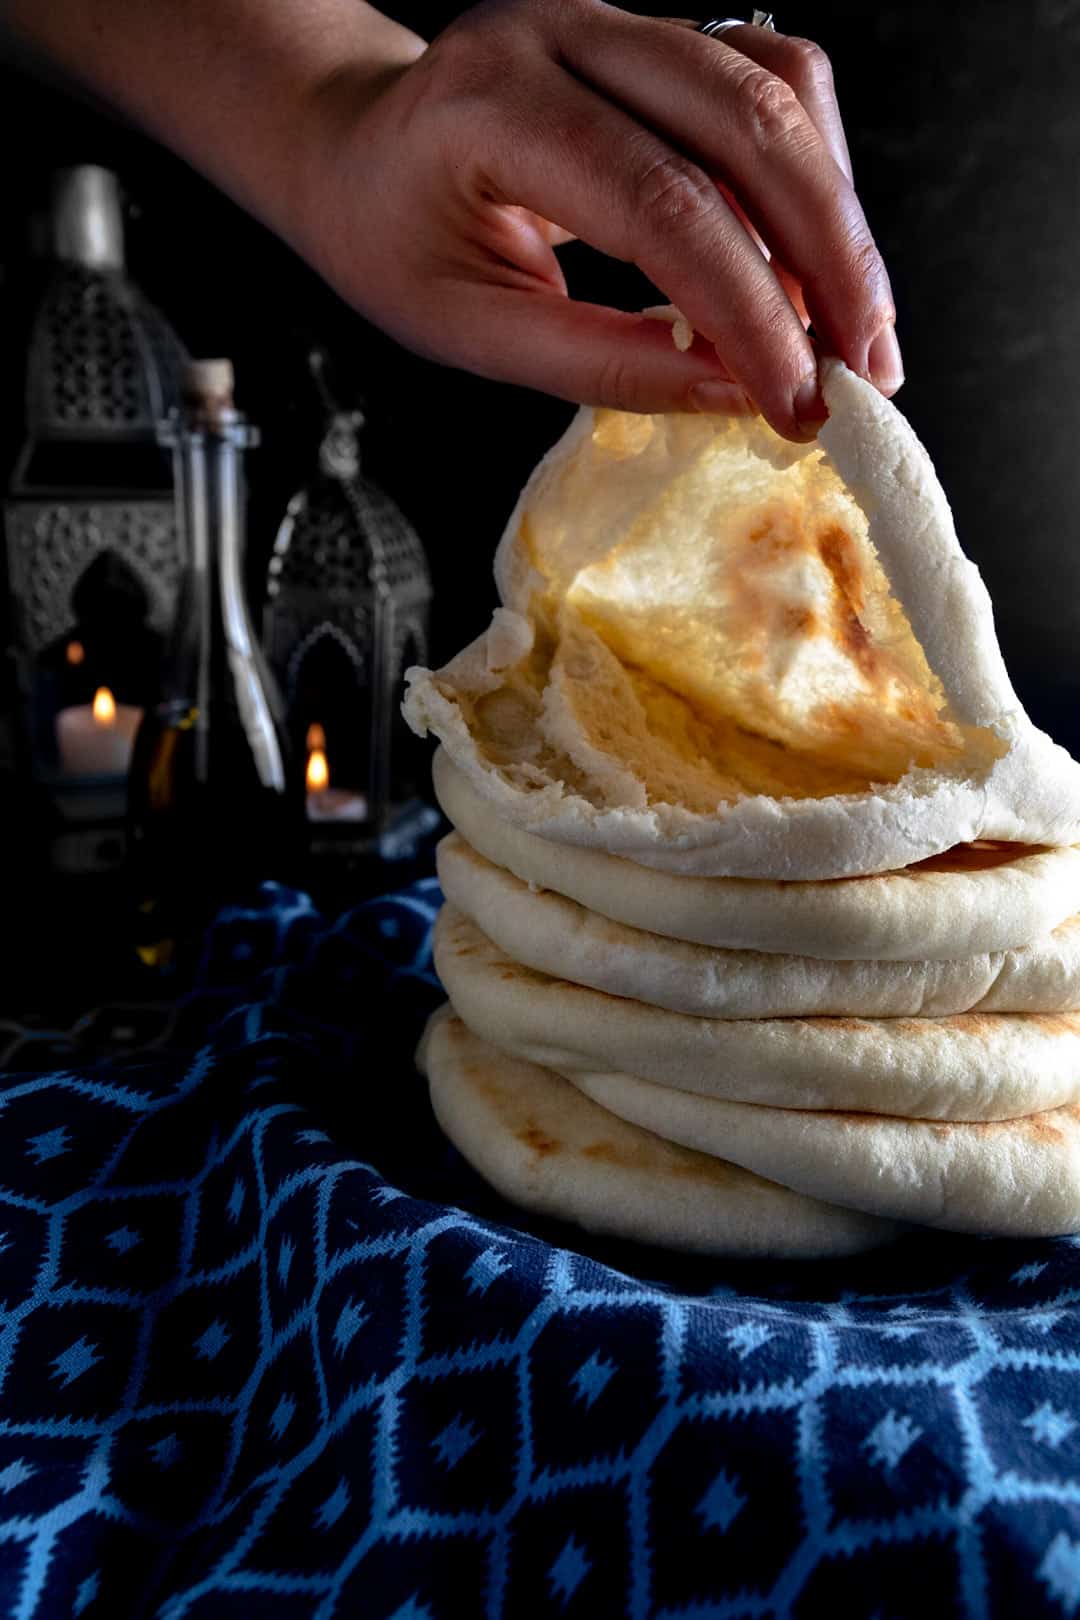
Fresh baked bread is always better than the store-bought stuff and this versatile recipe is sure to become a favorite in your own kitchen! Check out this post for our favorite pita recipe and all you need to know to achieve Perfectly Puffed Pita Pockets at home!
Serve this recipe with our chicken kofta kababs with garlicky yogurt sauce for a simple and delicious Middle Eastern meal.
Jump to:
How Does Pita Get a Pocket?
That magical little pocket in pita bread is created by steam that gets trapped in the baking dough. When the thinly-rolled dough hits your hot baking stone, the dough’s additional moisture quickly turns to steam.
When done correctly, that steam causes the dough to expand in the oven and creates a perfect little pocket! That stuff-able pocket is a distinguishing trait that separates pita from other styles of flatbread.
In this post I will show you all my best tips & tricks for making fresh pita bread that has a pocket.
Ingredients
The best part about pita pockets (besides the intoxicating smell of fresh-baked bread) is that it only takes a few, common ingredients. In fact, chances are you have everything to make fresh pita at home right now! Here's what you need:

- all-purpose flour
- warm water - About 105° - 115° Fahrenheit
- active dry yeast
- olive oil
- granulated sugar (optional, but recommended)
- salt
The key to getting full-flavored pita from these minimal ingredients is to create a quick, 20 minute sponge that helps bread develop flavor. (Read more about sponges below!)
How To Make Homemade Pita Pockets
Fresh and fluffy pita puffs are merely a couple hours away! Here's how it's done:
Step 1: Make a Sponge
When baking bread, a "sponge" refers to a simple pre-ferment process. It may sound technical but, let us assure you, it could not be any more simple.
I did test pita bread without the sponge method but found the resulting pita bland and a bit disappointing. This pre-fermented sponge method doesn’t require much extra effort, but leads to pita pockets that are far superior in flavor and texture.
To make a sponge you simply combine the yeast, warm water, a portion of flour and a small amount of sugar (AKA yeast food). The sugar is technically optional, but it helps to accelerate the process and contribute to deeper flavors.
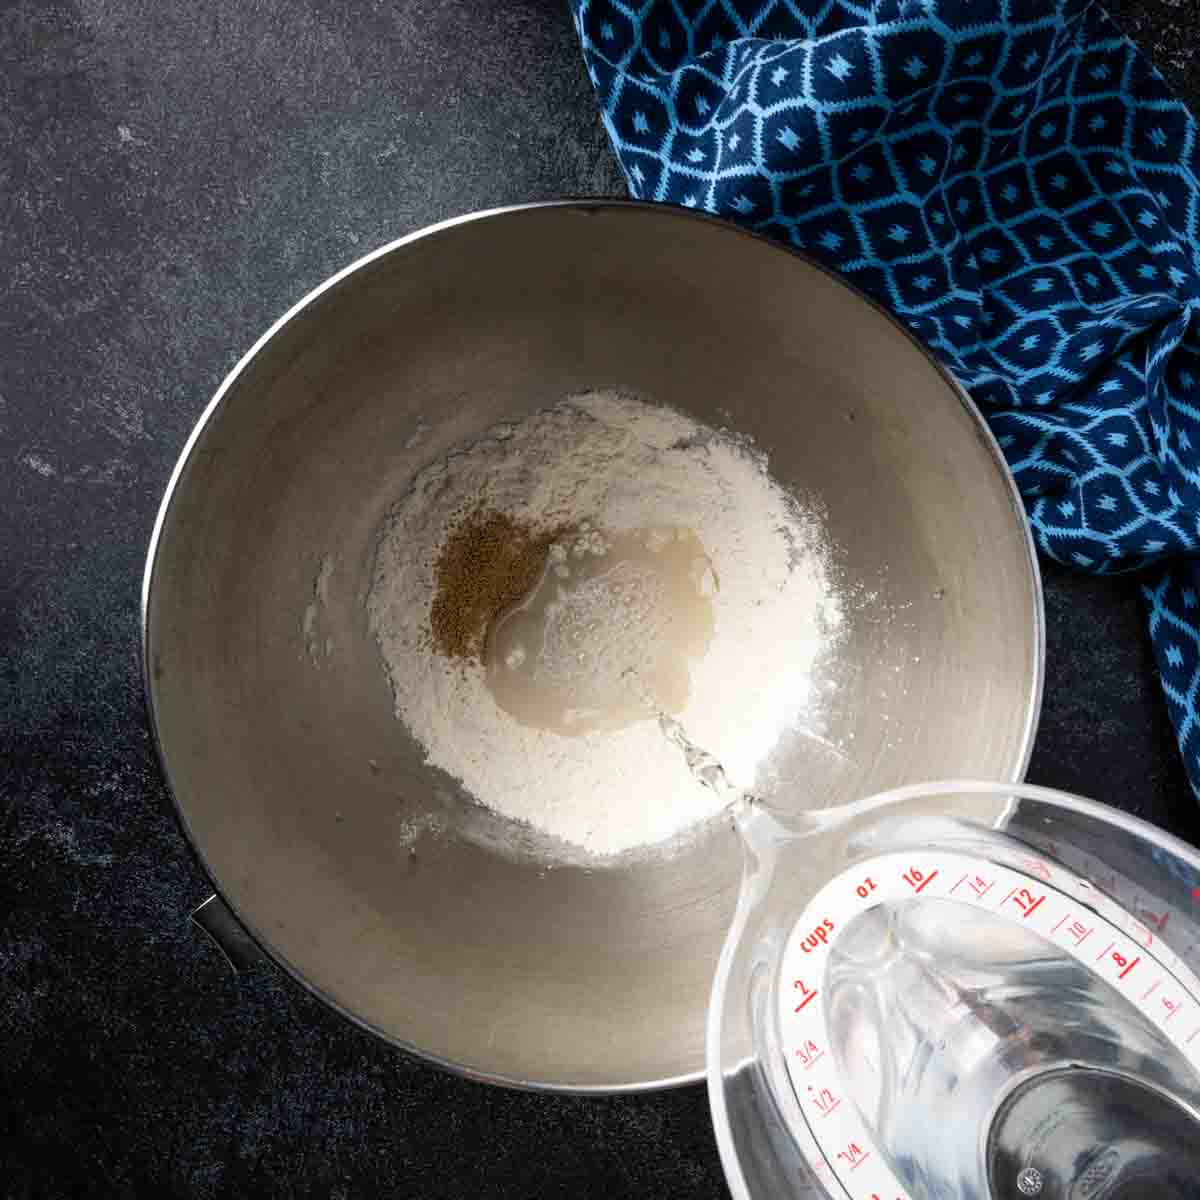
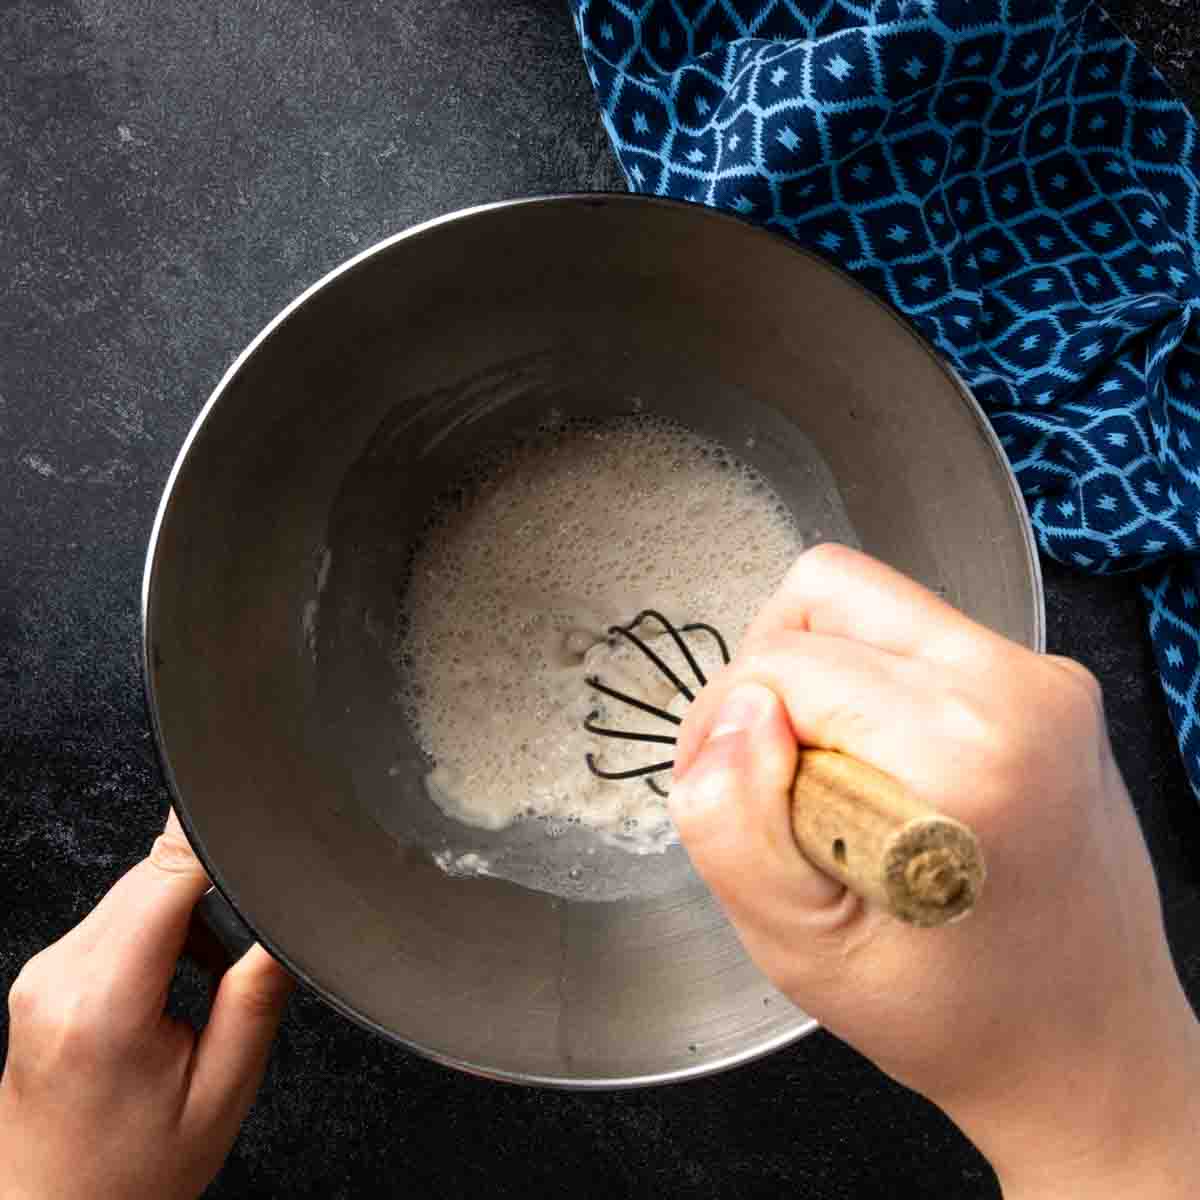
- In the bowl of a stand mixer combine active dry yeast, a portion of the flour, sugar and warm water. Whisk to combine and set aside.
Making a Sponge: How does it work? Once mixed, the sponge is set aside and this simple mixture begins to ferment. The warm water wakes the dormant yeast and, in turn, the yeast begins to feast. While the sponge ferments, gluten-softening enzymes are activated and the mixture begins to foam with carbon dioxide.
Using the sponge method quickly develops flavors reminiscent of sourdoughs. This process creates enzymes that aid in softening the flours' gluten structure to result in fluffier breads.
Before & After
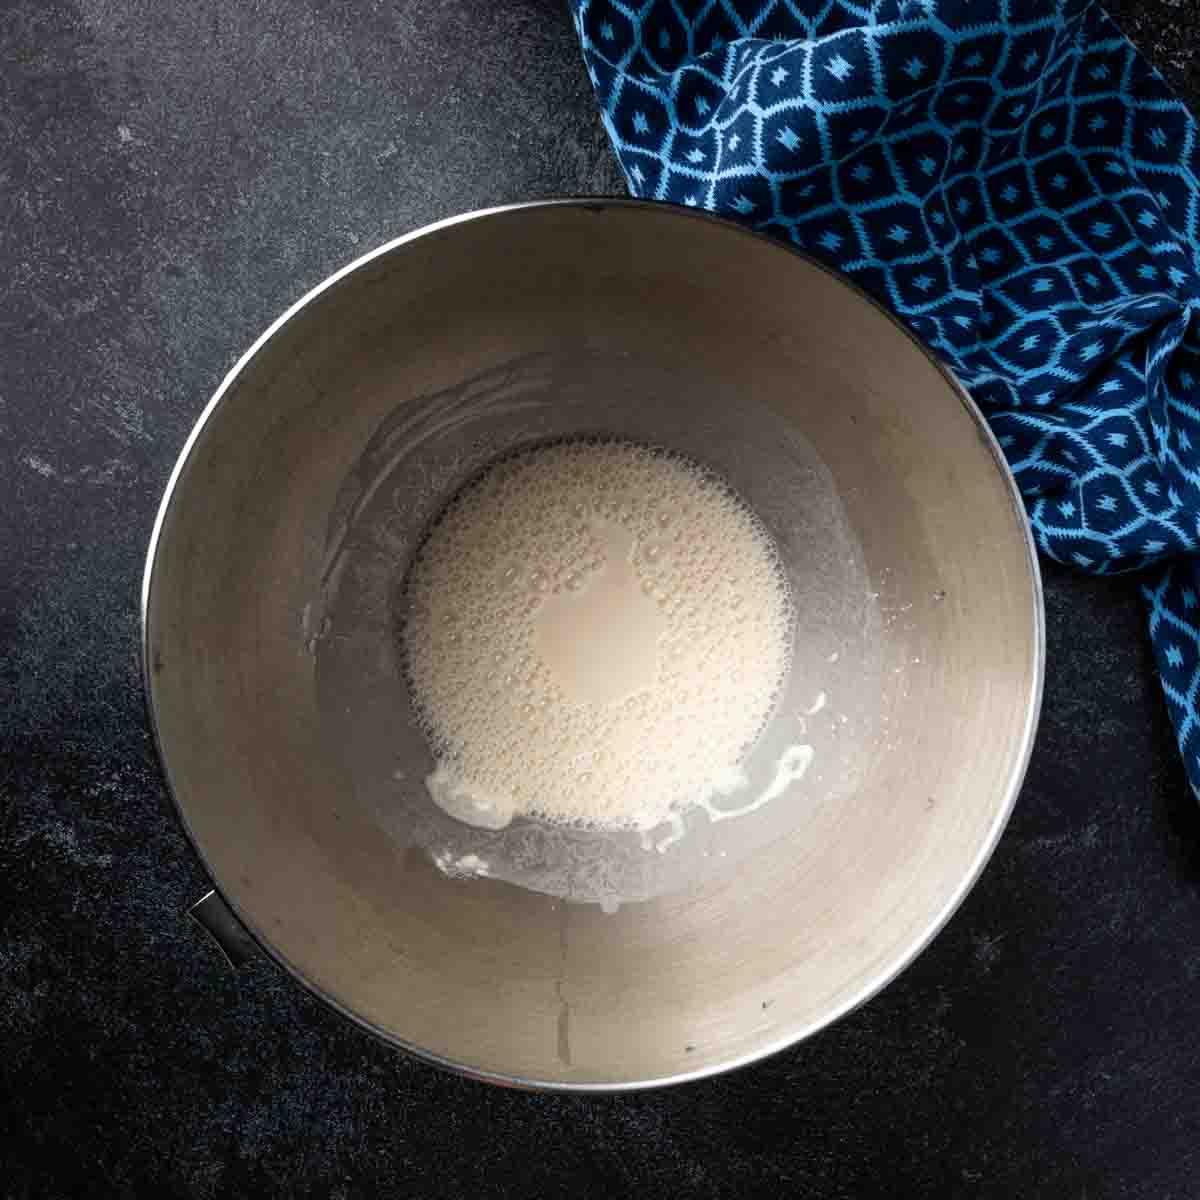
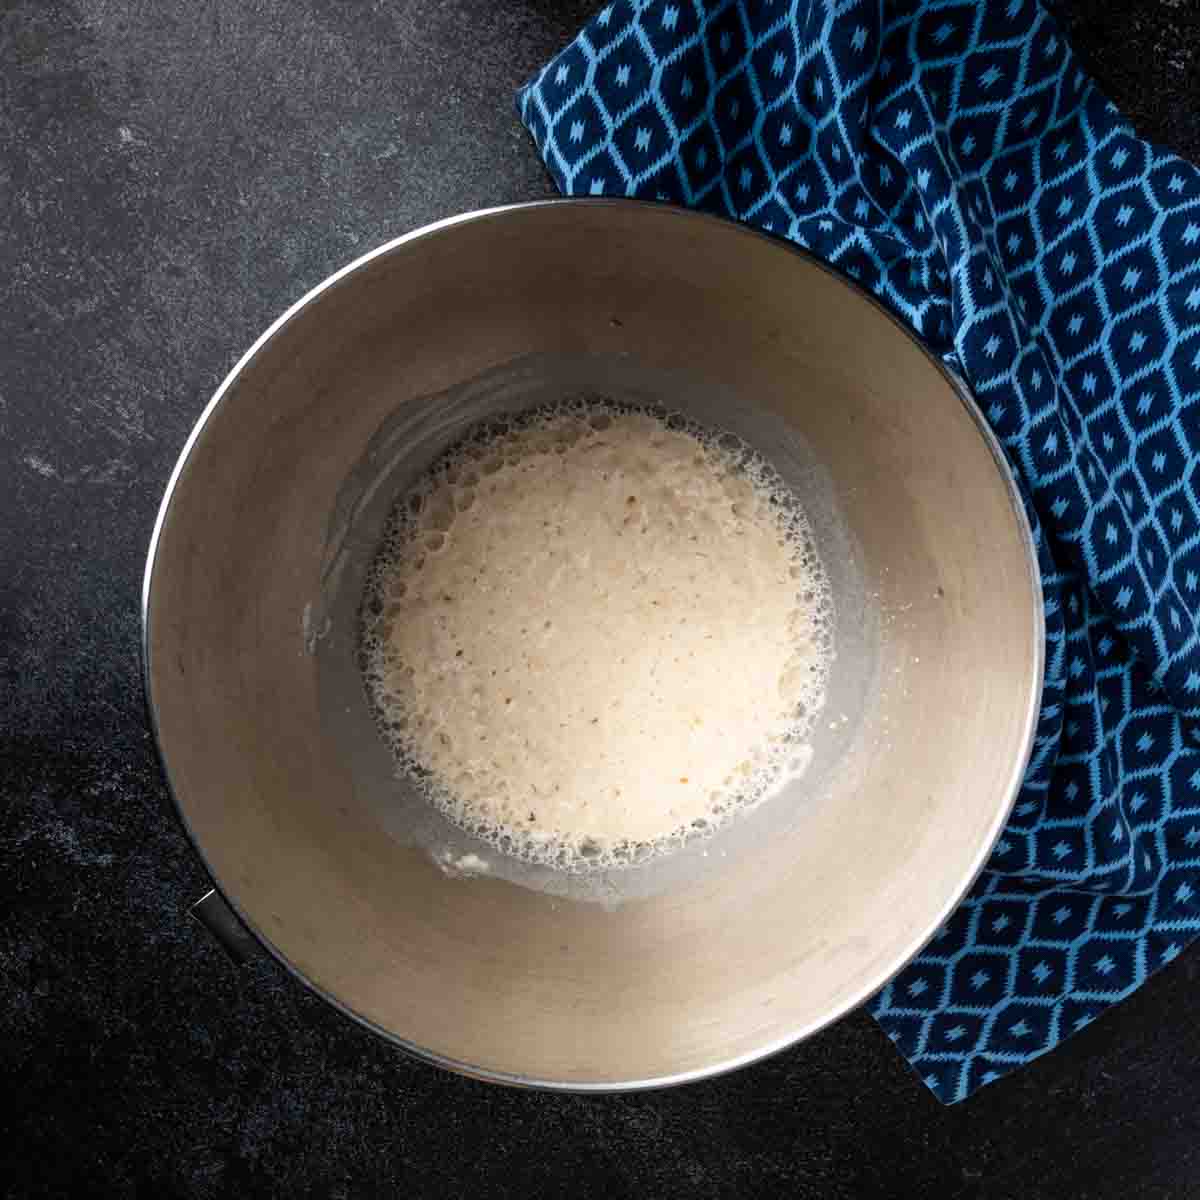
Here you can see the differences of a freshly mixed sponge and the sponge that has had a chance to mature. On the left is an image of the ingredients immediately after being combined. After 20 minutes, the image on the right shows a mature sponge that has grown in size and is actively bubbling.
Step 2: Mix the Dough
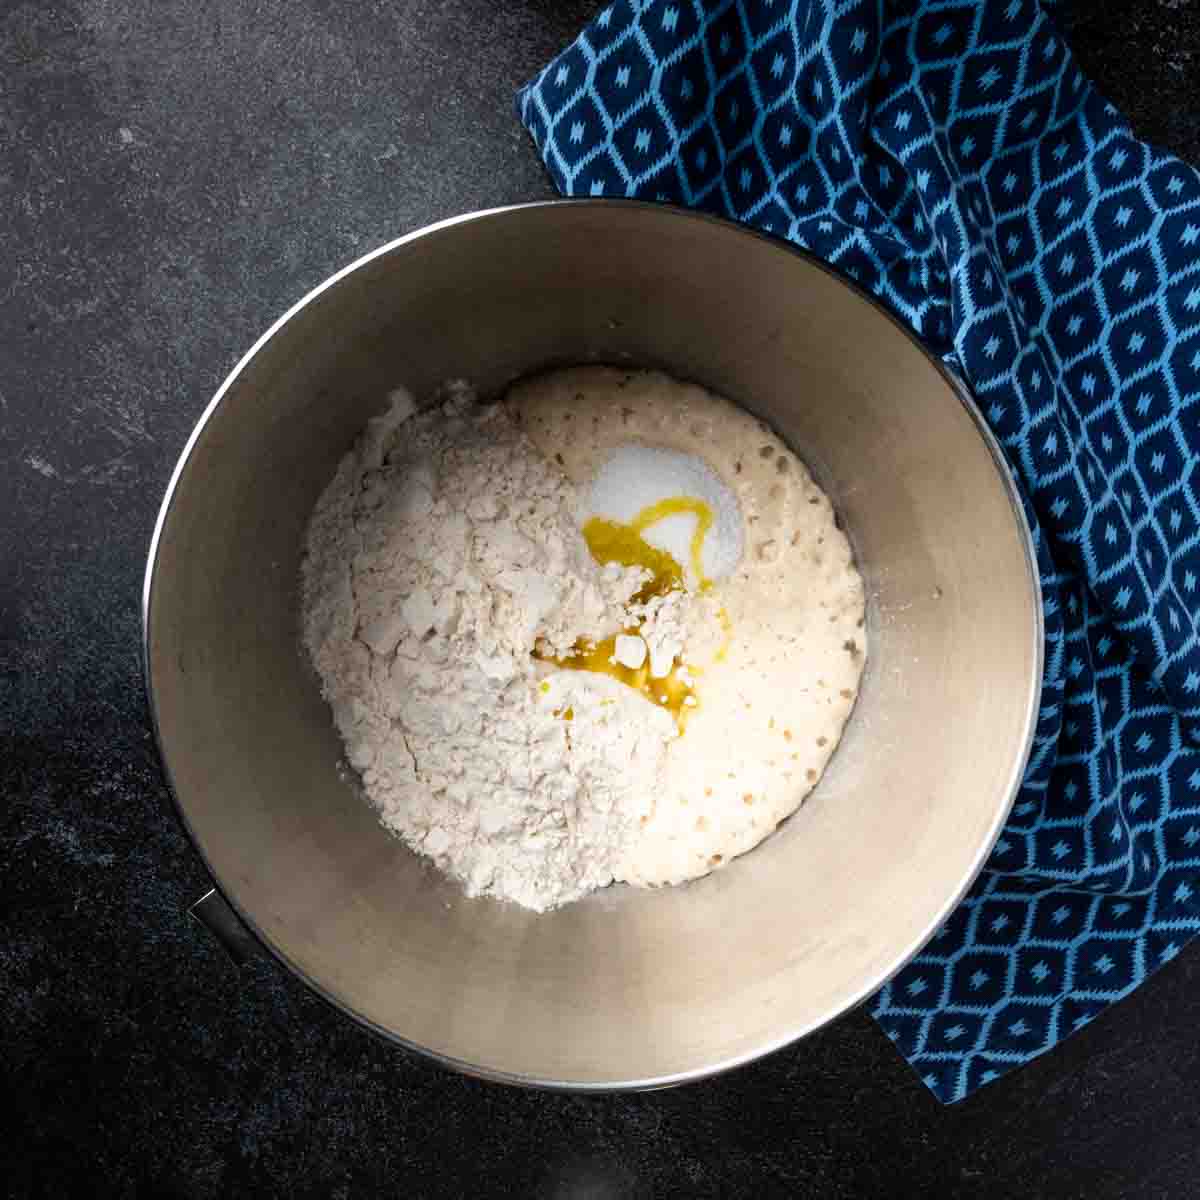
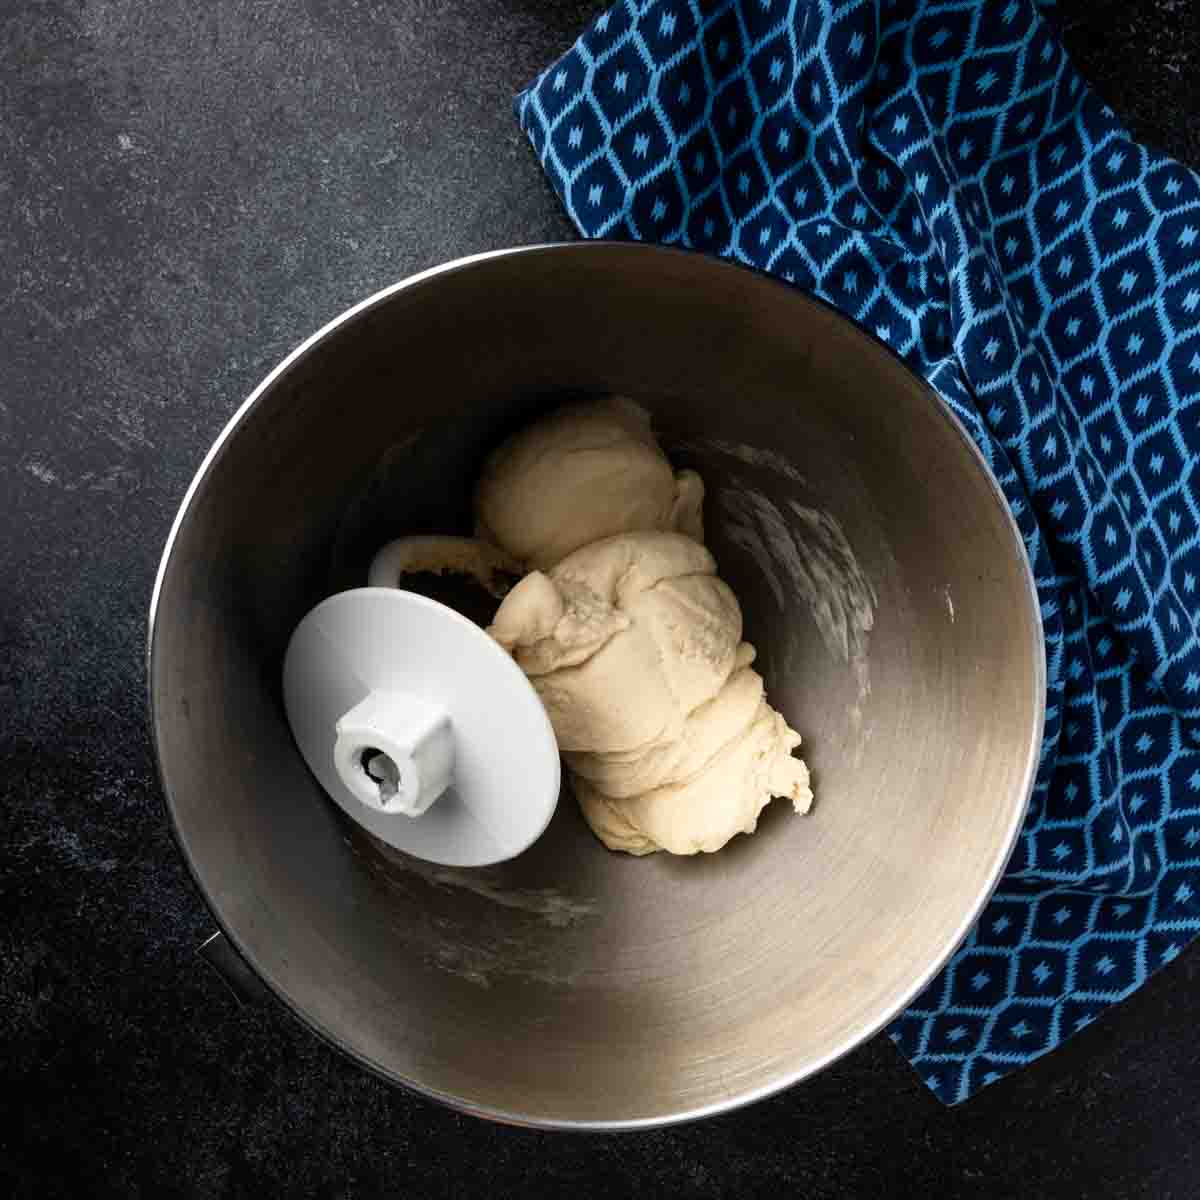
- Add the remaining flour, olive oil and salt to the sponge. Using the dough hook, knead on medium speed for about 5 minutes or until the dough is smooth and cohesive. The dough should be tacky.
Baker's Journal: Kneading by Hand - If making this dough by hand, dump the flour onto a clean, smooth work surface. Create a well in the center of the flour and add your sponge, salt and olive oil. Whisk the liquid ingredients into the flour until most of the liquid is absorbed and you can pull the dough together with your hands. Knead until smooth.
Step 3: Proof the Dough
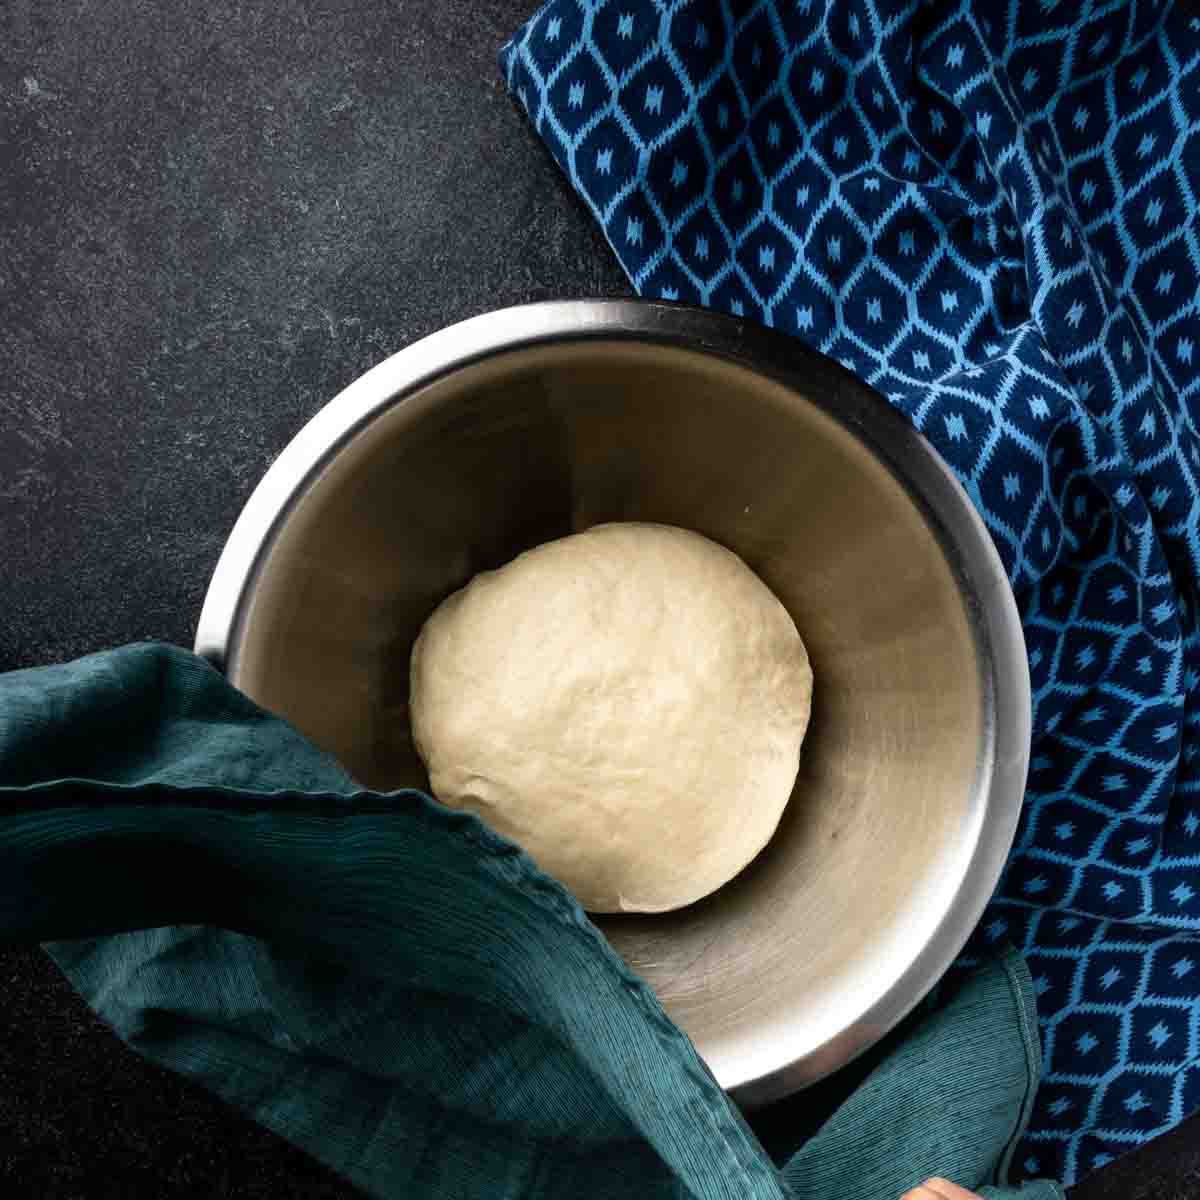

- Shape the pita dough into a round ball. Place in a well oiled bowl and cover with a clean, damp kitchen towel. Allow the dough to proof in a warm sauce in your kitchen for about 45 minutes, or until doubled in size.
Step 4: Preheat the Oven
Pita bread requires a very hot oven. If you have a pizza oven - this is a great time to use it. Otherwise, I recommend baking the pita bread on a baking stone (or cast iron).
- Place the stone (or large cast iron pan) on the bottom rack of the oven. (Most ovens heat source is on the bottom and it will be the hottest area.) Preheat your oven to the highest temperature (ours goes to 500° but anywhere in the 450° - 600° range will work. The hotter, the better).
Allow the oven to preheat for at least 30 minutes, but preferably one hour, to thoroughly heat the baking stone.
Steps 5 & 6: Punching Down & Shaping the Dough
- Turn the proofed dough out onto a clean work surface. Do NOT flour your work area - you need the dough to be tacky. Punch down the dough to deflate it.
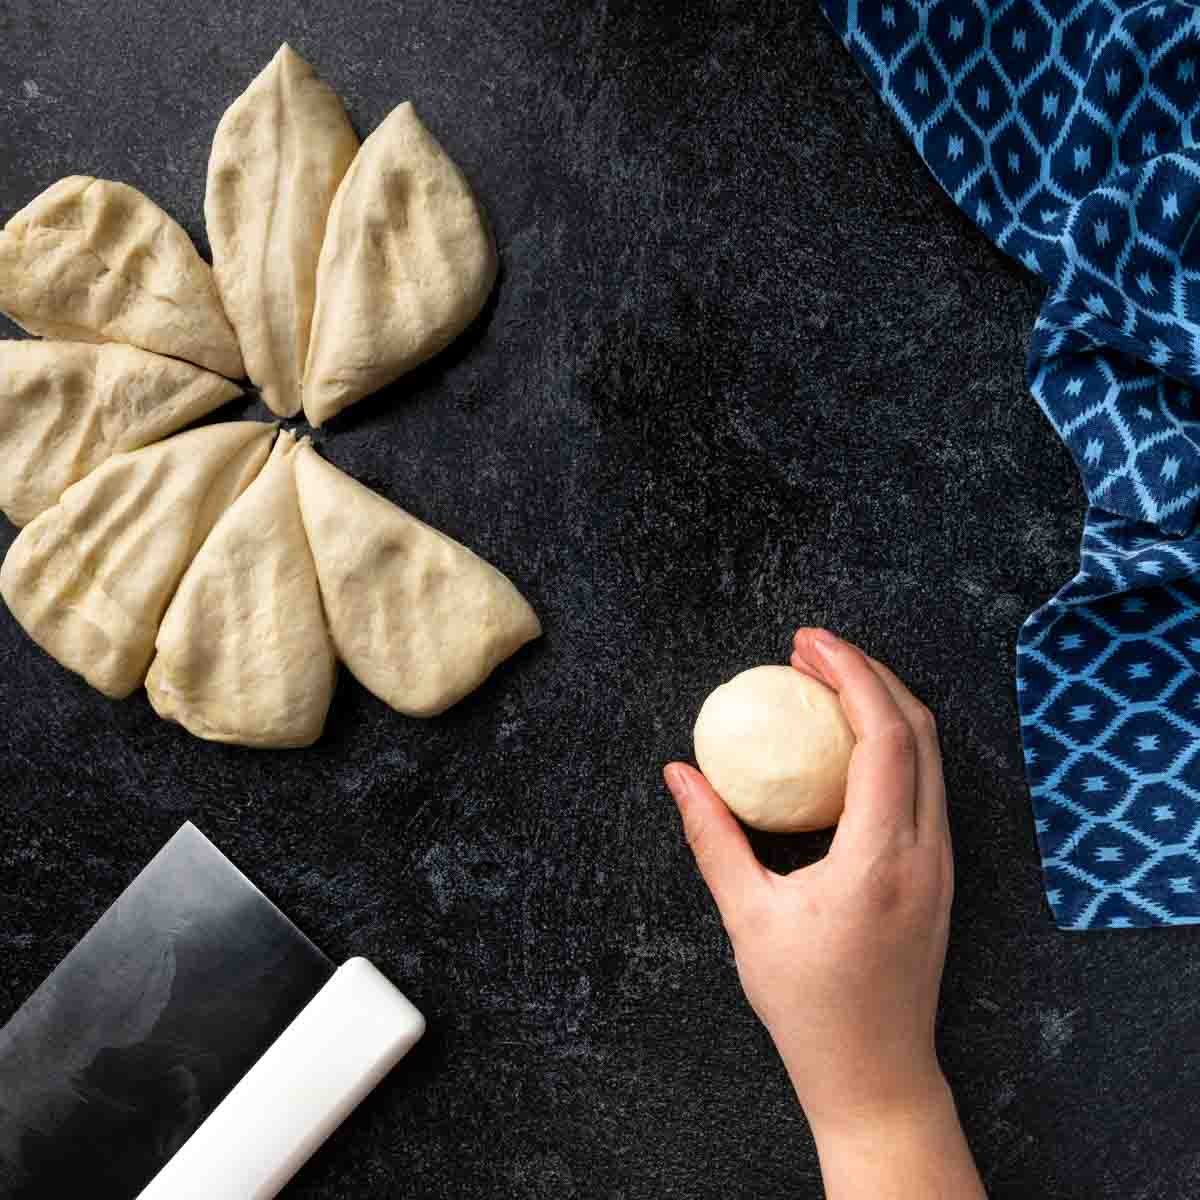
- With a cupped hand, use a circular motion on the counter surface to shape each piece of dough into a round, taut ball.
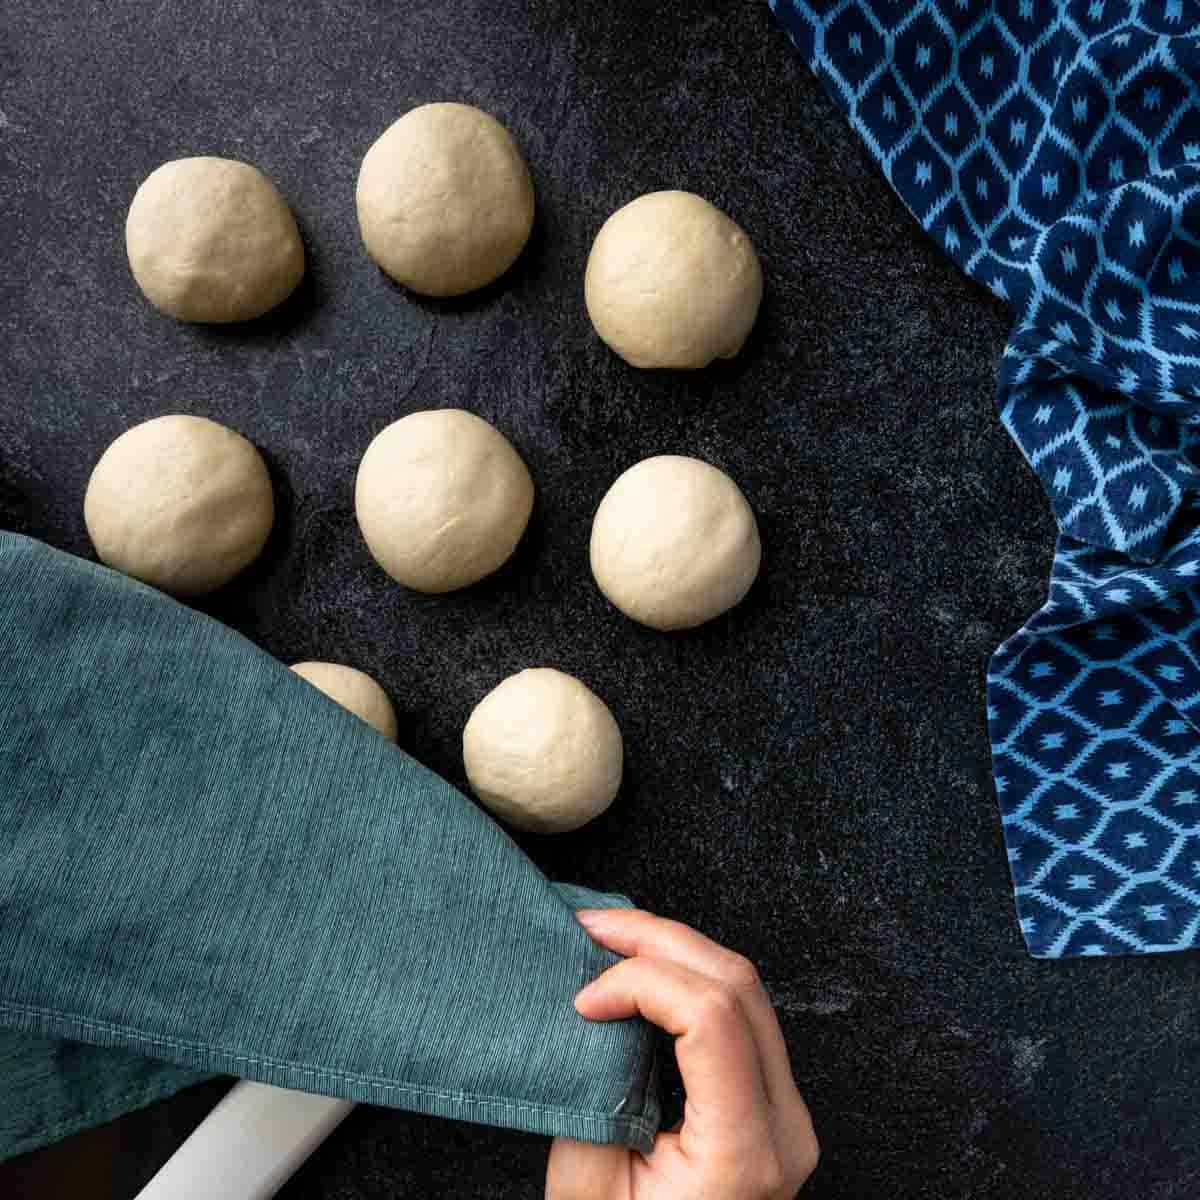
Step 7: Second Proofing
- Cover the rounds of dough with a damp kitchen towel and allow to proof again, for about 20 - 30 minutes or until puffy.
Step 8: Rolling the Pita
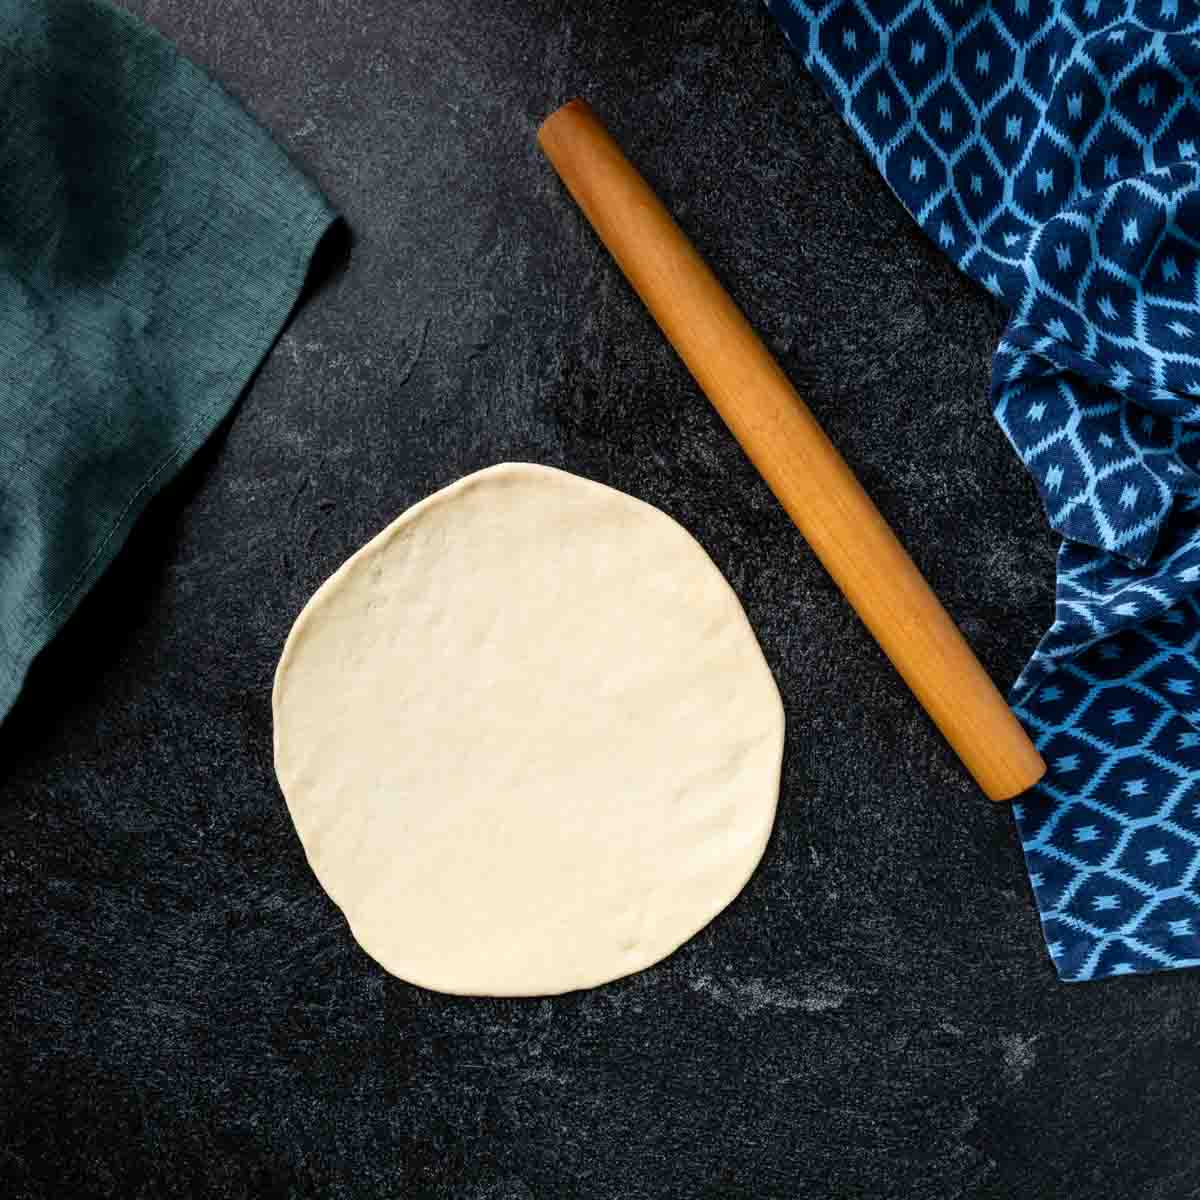
- Use a rolling pin to roll the dough into a circle. For pita pockets that fully puff up to create pockets, you need to roll the dough to a thickness of about ⅛ inch (approximately 4 millimeters or the width of two nickels).
Too thin or two thick... your pita will still be delicious but they may not fully puff to create a pocket.
I like to roll and bake my pita one at a time.
Step 9: Baking
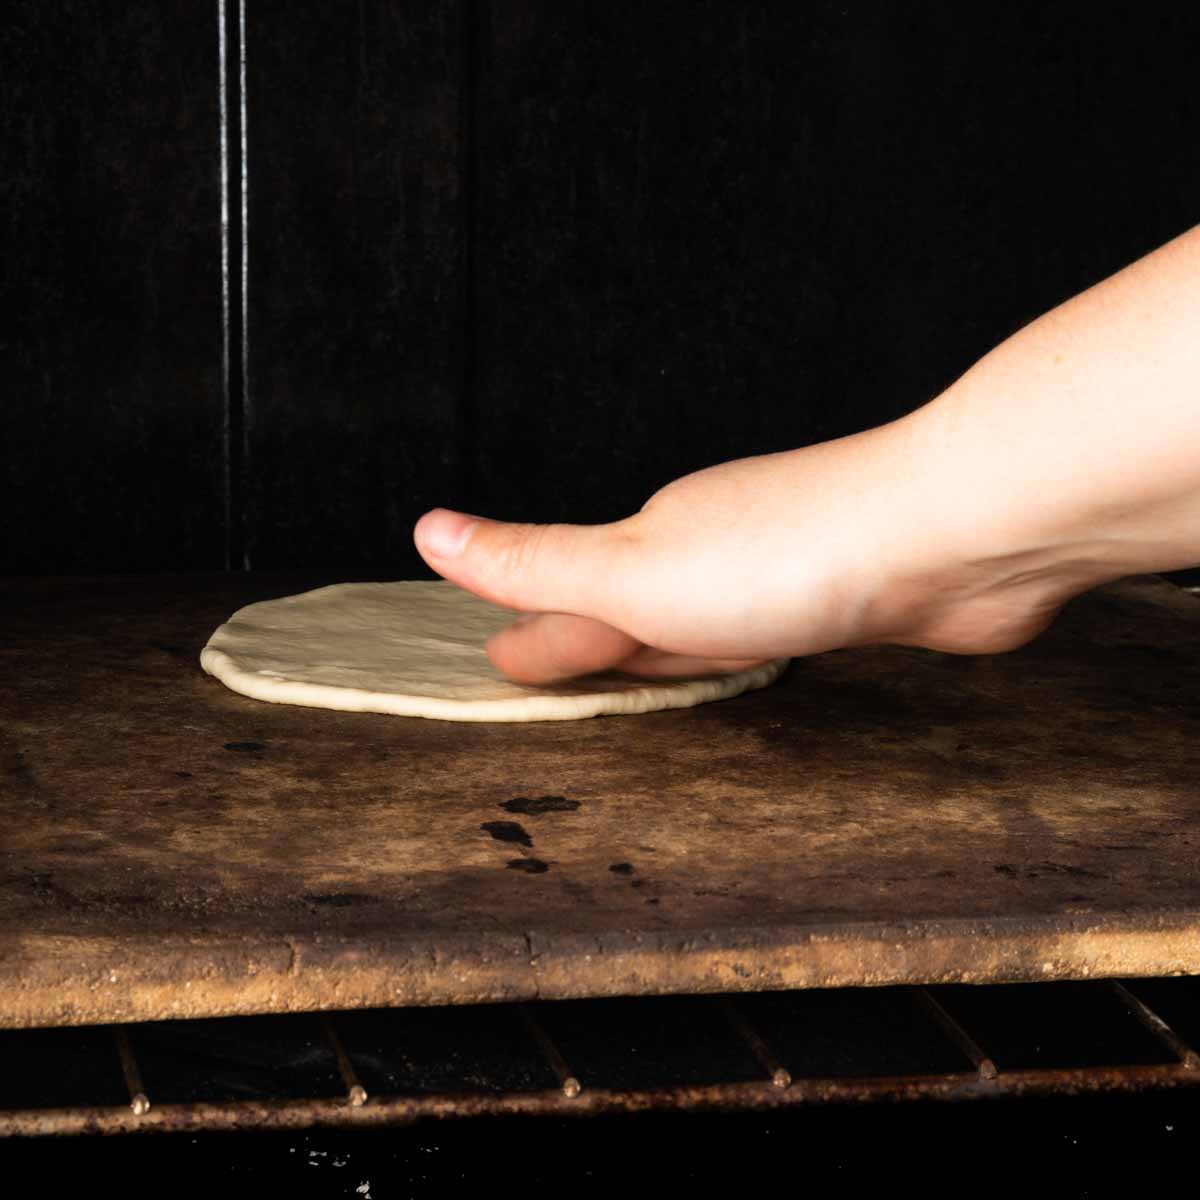
- With a flat palm, very carefully transfer the pita dough onto the hot baking stone. I like to bake mine one at a time. Try to work quickly to minimize the amount of time the oven door is open.
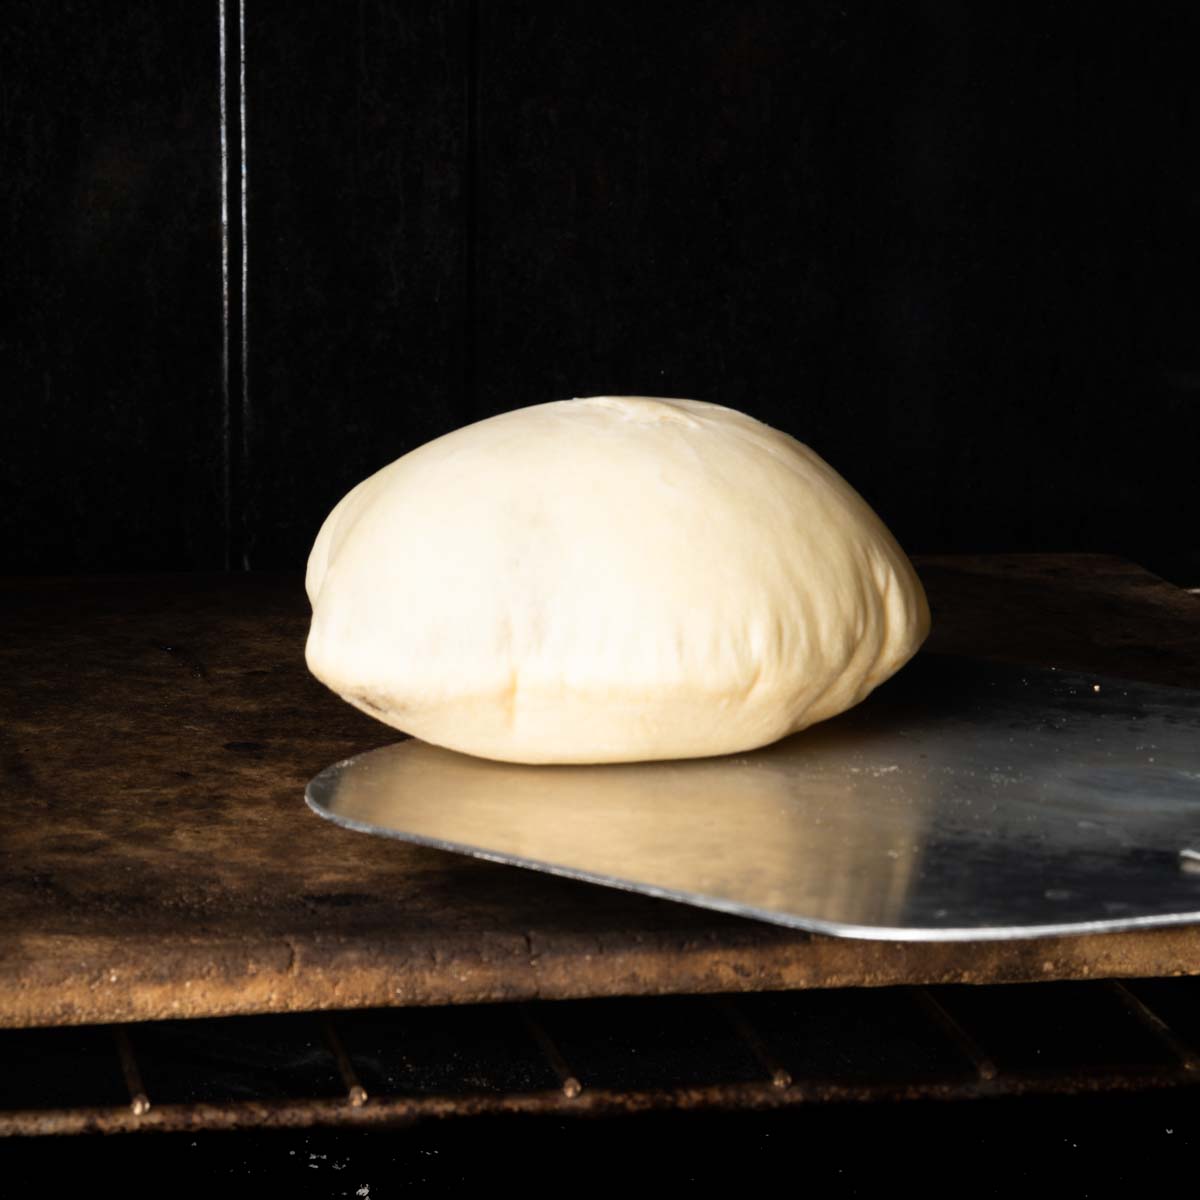
Bake, watching closely, for 2 - 3 minutes. When the pita has fully puffed up, it it fully baked and can be removed from the oven. Use a baker's peel, spatula or tongs to remove the baked pita.
Note: If after 2 - 3 minutes your pita doesn't fully puff, it should still be fully baked and delicious. Try playing around with the thickness of your dough to find that sweet pita-puffing spot. (If all else fails you, fear not. You made Greek pita which is traditionally thicker and pocket-less. 😉)
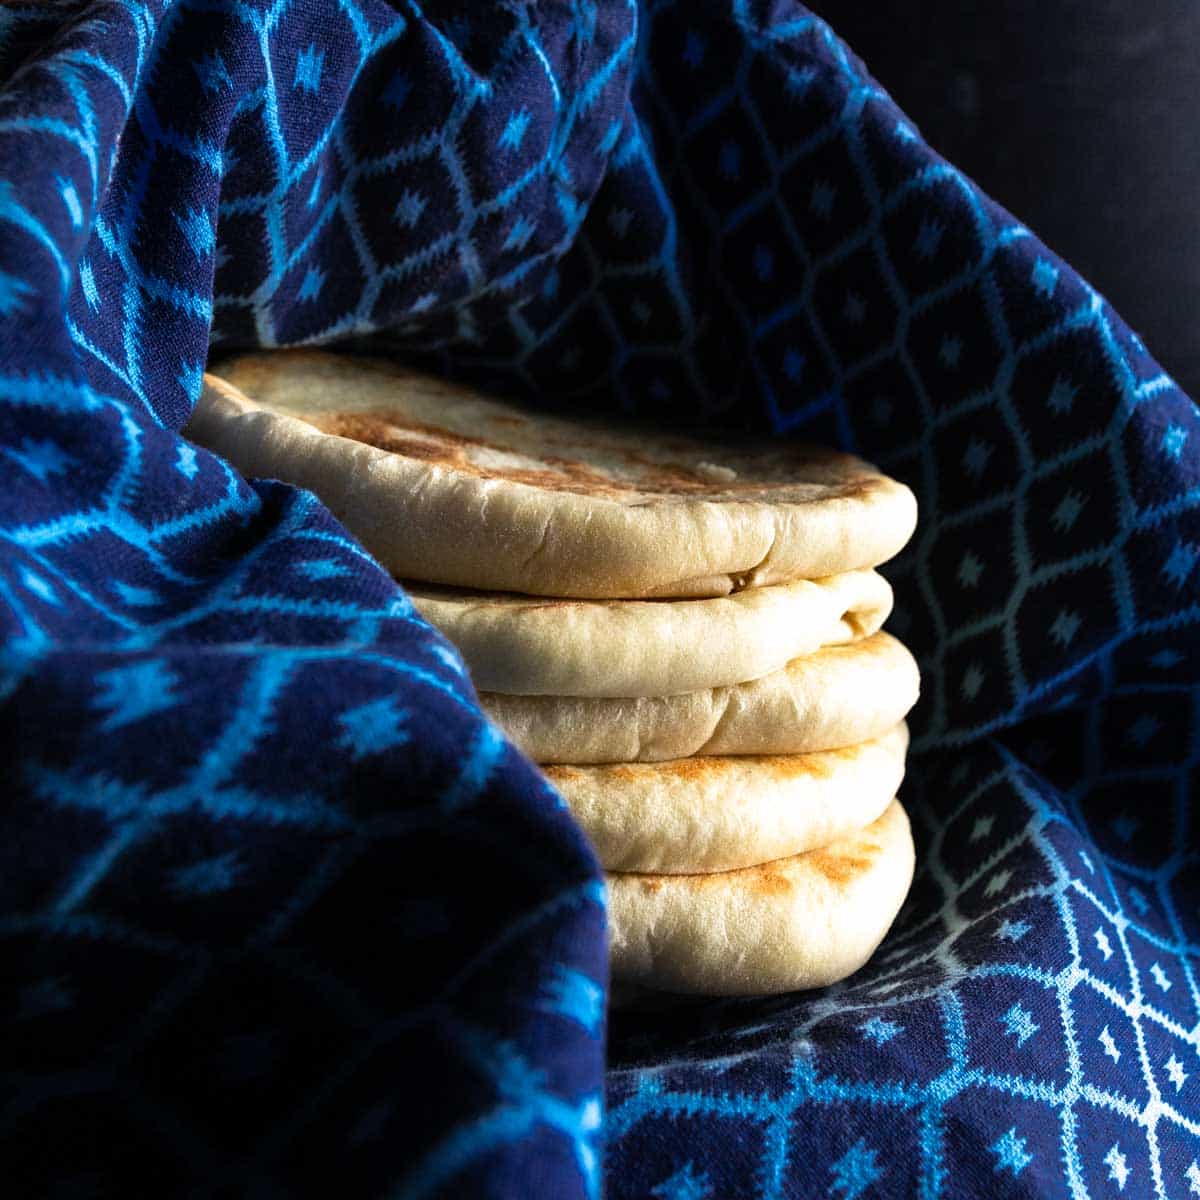
Immediately transfer pita bread into a bowl and cover immediately with a clean, dry kitchen towel. Trapping the fresh pita in their steam help to ensure a soft and fluffy texture.
Tips, Tricks & Troubleshooting
Mixing, Proofing and Shaping
- Keep your dough moist! - Sorry, if you hate that word - moist. Hear us out, though. Tacky dough is essential to creating pita pockets. That additional liquid creates the steam needed to puff your pita. Resist the urge and avoid adding additional flour when kneading or shaping.
- Shape your portions into round, taut balls. - Creating surface tension on the doughs' exterior is KEY to creating pita pockets.
- Proof your pita dough twice! - If you make yeast doughs often, you know active dry yeast benefits from a bulk fermentation and a secondary fermentation. (If you don’t bake yeast doughs regularly, now you know!) For some reason, many pita recipes omit proper proofing... we’re not sure why but... we’re telling you - two proofs are better than one.
- Roll your dough THIN! - Too thick and your pita can’t puff! Pita rolled to a 3 - 4 millimeter thickness is perfect.
Baking, Storing & Serving
- Get your oven HOT! - Get the oven super hot! The goal is to create your steam filled pocket quickly, to avoid crisping your bread. (Soft pita is where it’s at.) 450° - 600° Fahrenheit (235° - 315° celsius) is optimal.
- Do NOT open that oven door! - Oven temperatures plummet everytime the door is opened. Go ahead, and turn on the oven light but NO peeking through an open door! We recommend working quickly and tossing your pita onto a hot stone, while closing the oven door behind it. Please, be careful!!!
- Bake pita on a PREHEATED stone or cast iron pan. Pita bakes best on extremely hot surfaces. We like to use a pizza stone but , if you don’t have one, a cast iron skillet would work well, also. Preheat the stone or skillet at your oven’s hottest temperature for, at least, 30 minutes - one hour.
- Cover your fresh baked pita pockets with a clean, dry, dish towel. Covering your fresh-from-the-oven pita with a cloth will help steam the exterior of the bread and keep your pita fluffy and irresistibly soft. Keep pita covered and serve warm, whenever possible.
- Serve pita warm! Pita is best when served warm! Serve fresh from the oven, whenever possible! Otherwise, microwave pita pockets for 10 - 30 seconds. If a day or two old, wrap pita in a damp kitchen towel and bake at 300° Fahrenheit for 5 - 10 minutes, or until softened. If stale, consider baking pita into chips!
Spice it Up! Seasoning Suggestions
Pita is fantastic plain-Jane style. However, if you’d like to spice it up - let’s do it! We recommend mixing dried spices or fresh herbs with olive oil and brushing the seasoning on the pita dough, before baking. Then, bake the pita with the oil-and-seasoning-side-up to prevent burning. Seasoned pita may not puff as beautifully as plain pita - but the seasoned variations are delicious accompaniments for hummus, baba gahnoush (Lebanese eggplant dip), labne yogurt, muhammara (Israeli pepper dip), and more!
Our Favorite Seasonings and Spice Blends
- Sea Salt - Simple and delicious! Try a flaky salt like Malden or Fleur de Sel.
- Garlic Oil - Mincing some garlic into olive oil and brushing it on the pita dough will add more flavor and pair well with many savory dishes. Add a sprinkle of ground Aleppo pepper for a dash of heat!
- Baharat - Baharat is a Middle Eastern spice blend that adds delicious warm spice flavor to fresh pita.
- Za’atar - This popular Middle Eastern spice blend can be found in most spice stores and is our FAVORITE pita pocket seasoning. Our blend is made of wild thyme, sesame, sumac and lemon zest but others may also contain oregano and marjoram.
- Sesame Seeds - A classic addition that goes great with most Middle East and Mediterranean flavors.
- Harissa - This North African chili spice will bring the heat!
- Fresh Herbs - Fresh herbs can transform your pita to a well-paired savory side-dish. Try thyme, parsley or lavender to fit with more European-inspired dishes.
- Cinnamon Sugar - Pita bread doesn’t have to be savory! Use vegetable oil (or melted butter!) and dress fresh-baked pita with cinnamon sugar for a sweet treat!
Serving Suggestions
Fresh baked pita pockets are the perfect pairing for SO many dishes! Here are a few of our favorite pairings:
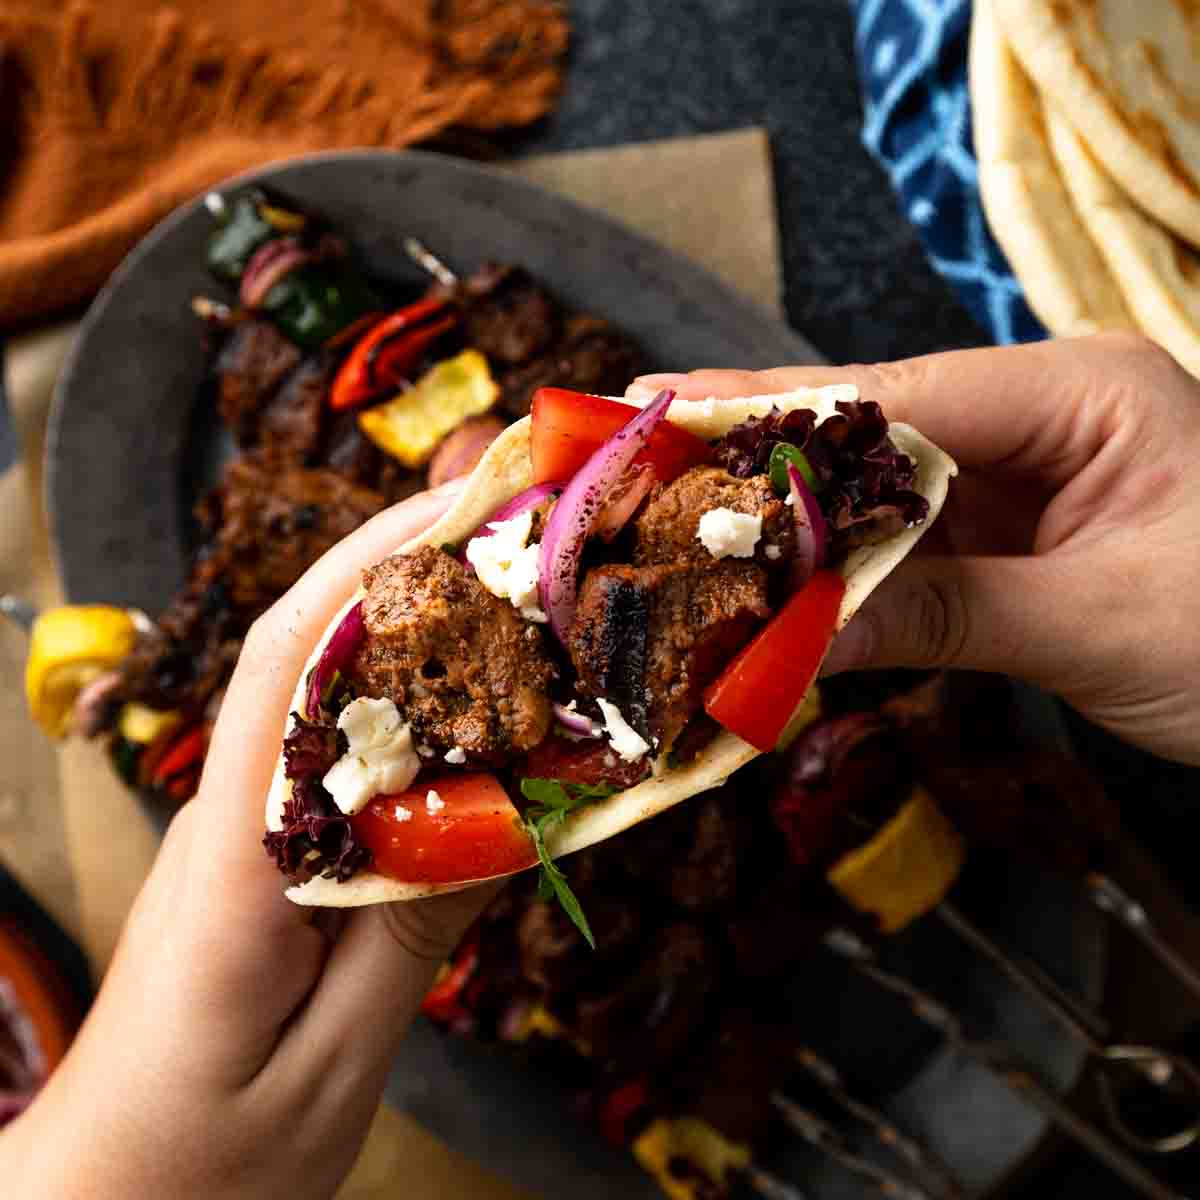
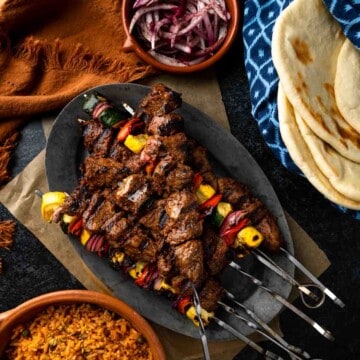
- Kebabs - Pita is the perfect pairing for all sorts of grilled meats and kebabs. Try it with our Turkish lamb skewers recipe or our chicken kofta kebabs.
- Sandwiches, Wraps and Grab-and-Go Vessels! Falafel! Shwarma! Gyros! Souvlaki! Deli Meats! Veggies! Fries! The list goes on... Pita pockets are destined for stuffing with delicious meats, cheeses and veggies! Get creative!
- Dips, Spreads, Mezze Platters or Charcuterie Boards! Hummus is the classic go-to, but don’t stop there! Pita is a blank canvas that easily pairs with endless dips, sauces or spreads! Try it with our Spinach Hummus with Lemon Artichokes!
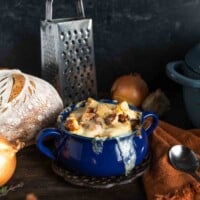
- Side Dish for soups, stews, curries or hearty braised dishes. Sop it up! Try it with our Roasted Parsnip Soup with Gremolata Croutons for a healthy, hearty (easily made vegan) meal!
- Pita Pizza! The kids (and kids at heart!) will love this one! Top with tomato sauce and cheese, as desired, and broil to golden perfection!
- Salads - Crispy pita bread can be crumpled over salads in lieu of croutons! These crunchy additions go great in Lebanese-style fattoush salads with cucumbers, radishes, tomatoes and a sprinkle of tart sumac!
Saving & Storing
- Room Temperature: Pita bread can be kept in an airtight container at room temperature for 2 - 3 days.
- Freezer: Pita also freezes exceptionally well. Keep pita twice-wrapped (to prevent freezer burning) in the freezer for up to 2 - 3 months. Frozen pita can be thawed at room temperature or in short increments in the microwave.
If pita becomes stale, make into baked pita chips. Cut the bread into wedges and bake at 400° Fahrenheit for 8 - 15 minutes until crispy. Oil and season, as desired.
Frequently Asked Questions
Pocketless pita can be the result of many things. Common issues for pita that does not puff up in the oven is the result of dough that is improperly proofed, dough that is too dry, dough that was not rolled thin enough or baking at too low of a temperature.
When the thinly rolled pita dough is added to the heat of a very hot oven, the exterior of the bread begins to cook. Meanwhile, the moisture in the dough creates steam that becomes trapped inside the dough, creating a pocket.
Pita is lower in calories and fat than naan bread.
You May Also Like...


Recipe
Perfectly Puffed Pita Pockets: Recipe and Guide
ADJUST SERVINGS
Special Equipment
- Stand Mixer with Dough Hook Attachment (Optional)
- Pizza Stone or Large Cast Iron Skillet
- Bench Scraper (or Knife)
- Baker's Peel (optional)
Ingredients
Sponge (Pre-Ferment)
- ½ Cup all-purpose flour
- 1 Cup Water warmed to about 105° Fahrenheit (40° celsius)
- 2 ¼ teaspoons active dry yeast (1 packet)
- 1 teaspoon granulated sugar (optional, but recommended)
Pita Dough
- 1 recipe Sponge matured for twenty minutes
- 2½ Cups all-purpose flour plus more, as needed to prevent sticking
- 3 Tablespoons olive oil plus more, as needed for oiling the bowl
- 1 Tablespoon fine kosher salt*
Instructions
- Make the sponge: In the bowl of a stand mixer fitted with the dough hook attachment, combine all sponge ingredients. Stir to combine. Set aside to pre-ferment for 15 - 20 minutes.
- Make the dough: After the sponge has matured for 15 - 20 minutes, add the remaining pita dough ingredients (flour, olive oil and salt) to the sponge in the bowl of a stand mixer. Knead the dough on low-speed for 4 - 6 minutes until dough is smooth and cohesive. (See Note: a.) Dough will be tacky and should stick, slightly, to the bottom of the bowl. If overly sticky, knead in additional flour, 1 Tablespoon at a time.
- Proof the dough: Turn dough out onto a clean work surface. Flour, very lightly, only if necessary. Knead by hand once or twice to shape into a smooth round. Transfer dough into a well-oiled bowl and cover with a damp kitchen towel or plastic wrap for proofing. Allow to proof in a warm space for 45 - 60 minutes or until doubled in size.
- Preheat the oven: Meanwhile, arrange a rack in your oven to the lowest position. Place a baking pizza stone or cast iron on the rack and preheat to your ovens highest temperature setting. (About 500 - 550° Fahrenheit or 260 - 288° celsius). Preheat the oven for, at least, one hour before baking. (See Note: b.)
- Punch down the dough: Once doubled, turn dough onto a clean work surface. Do not flour your work surface, hands or dough. You will need tacky dough to properly shape the dough into rounds. Punch down the dough to deflate it of any air.
- Portion the dough: With a sharp knife or bench scraper, cut the dough into six or eight portions, as you would a pie. One section at a time, shape the dough into a round by rolling it, in your cupped hand, against your work surface. You should create a smooth, taut surface for each round of dough. Pinch the ends closed on the bottom of each round, if necessary.
- Proof the dough (again): Once portioned, cover the pita dough rounds with a damp kitchen towel or plastic wrap. Proof the portioned dough an additional 15 - 25 minutes, until puffy. Halfway through your proof time, flip each portion of dough over. (Flipping the dough helps to evenly distribute to air and prevent uneven pita pockets.)
- Roll the dough: Working one round at a time, gently deflate the dough with your palm. On a lightly floured work surface, to prevent sticking, roll each portion into rounds between ⅛ inch and ¼ inch thick (about 4 millimeters is optimal). (See Note: c.)
- Bake the dough: One or two at a time, transfer the rolled dough (with your hand or baker’s peel) onto your hot baking stone or cast iron. Wit the oven light turned on, watch the dough closely. Pita pockets are fully baked as soon as they have fully inflated in the oven, about 2 - 3 minutes. Once puffed, transfer the freshly-baked pita bread onto a plate or bowl and cover immediately with a clean, dry kitchen towel.
- Serve: Serve pita bread warm as a sandwich, side or appetizer! Enjoy!
Video
Notes
* A Note About Salt
Unless otherwise noted, all recipes on The Sage Apron are developed using Diamond Crystal Kosher salt. It is a great all-purpose salt for cooking and baking. If using table salt, reduce quantities by about half.

Comments
No Comments