


Homemade Fettuccine Pasta is a fun and easy way to treat your family, friends and guests! This fresh pasta can be made with a pasta machine or entirely by hand!
These chewy, golden ribbons of pasta can be paired with endless variations of sauces, soups, meatballs, and more! This easy technique is able to be mastered by even the most novice of pasta makers and the delicious results will be sure to impress!
This recipe is a variation of our Homemade Semolina Pasta Dough recipe. For a simple sauce pairing try our San Marzano marinara or Spinach Pesto recipes.
Jump to:
- Lovely Little Ribbons of Perfectly Made Pasta
- Ingredients for Homemade Pasta Dough
- How To Make Homemade Pasta
- Rolling Fettuccine Pasta by Hand
- Hand Cut Noodles
- Making Fettuccine with a Machine
- How & Why To Dry Your Pasta
- Boiling & Saucing Your Little Ribbons
- Serving Suggestions
- Frequently Asked Questions
- More Pasta Recipes
- Recipe
- Comments
Lovely Little Ribbons of Perfectly Made Pasta
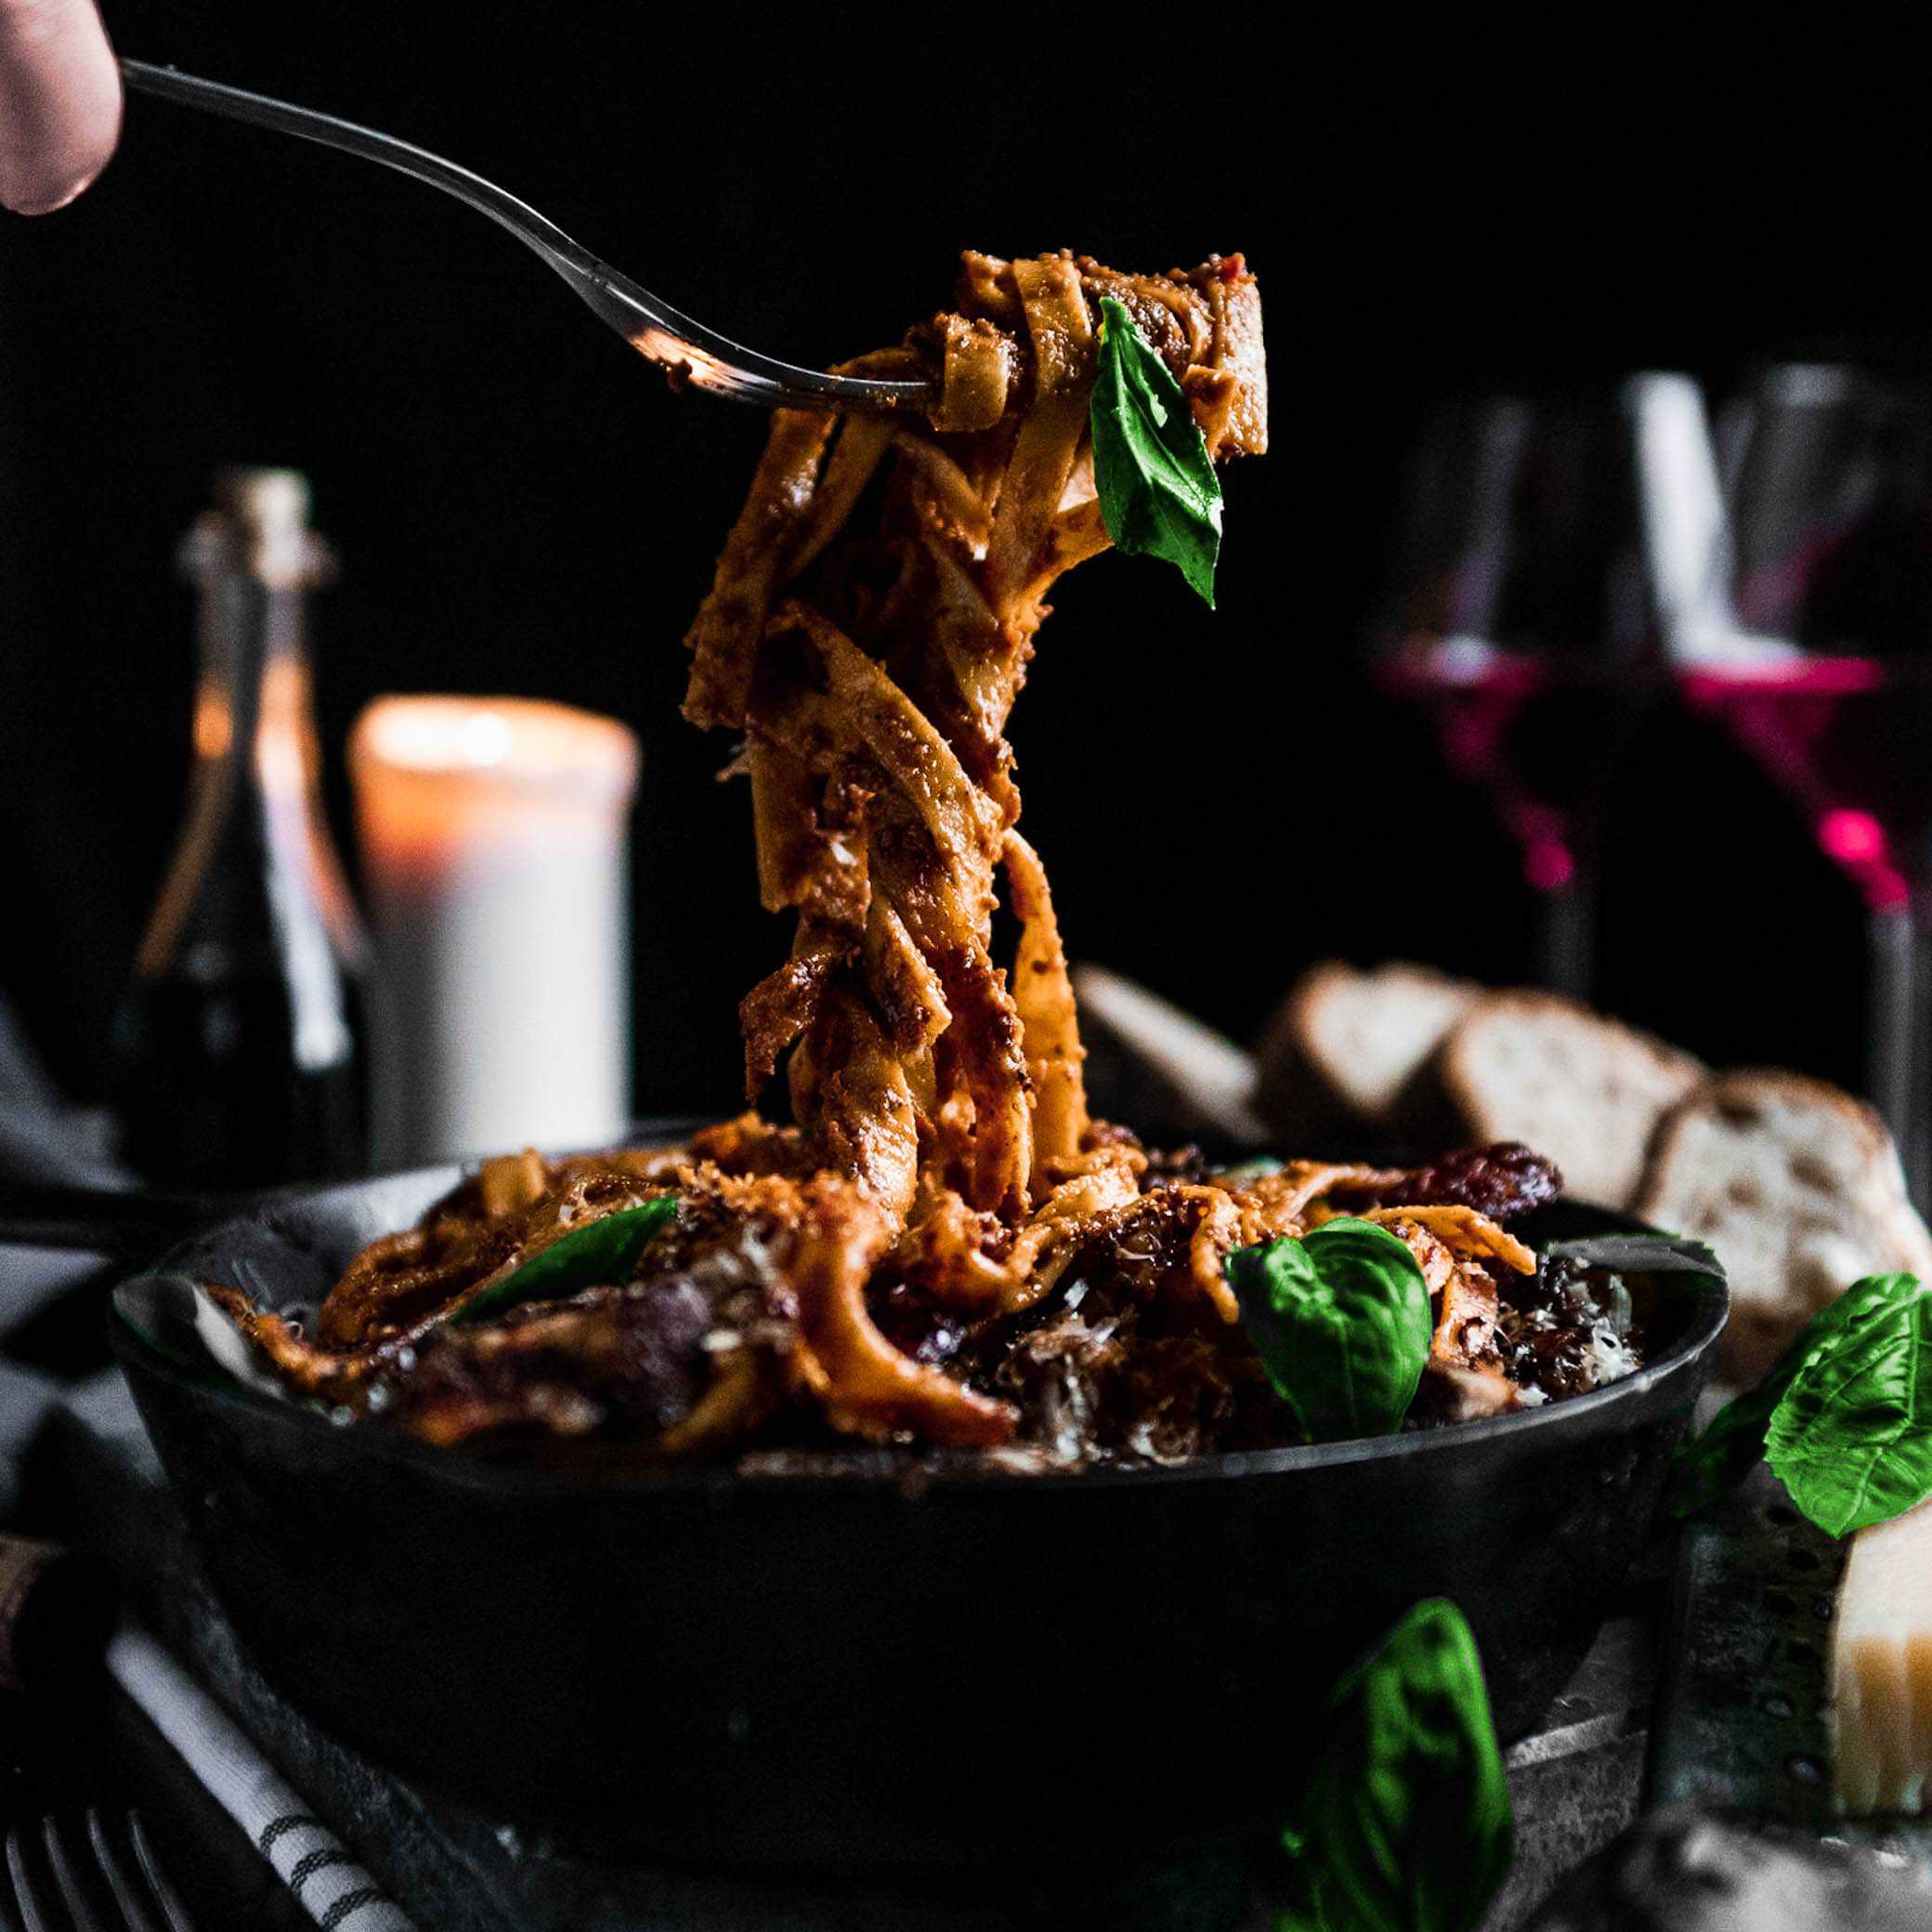
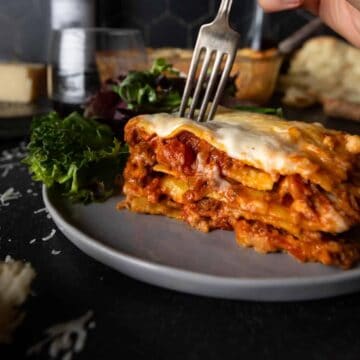
Fettuccine pasta is an Italian classic that is quite popular in both Tuscan and Roman cuisine. These wide, flat noodles are traditionally made from a classic egg-based pasta dough. Fettuccine, translating to "little ribbons", makes for the perfect starchy noodle to accompany hearty sauces like bolognese, amatriciana and America's favorite - fettuccine Alfredo. We also love to use fettuccine for simple red sauce meals and in chicken noodle soups.
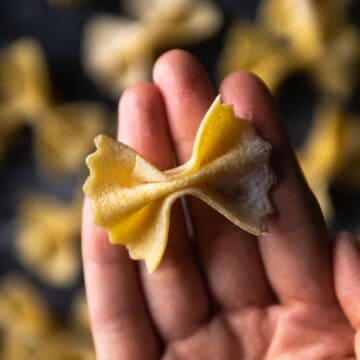
Homemade fettuccine is one of the first pasta shapes I was able to master and is a great place for the budding pasta maker to begin their journey. You can use this same recipe and technique to make other noodles like spaghetti, tagliatelle or a wider, heartier pappardelle. (Then, you can graduate to shaping pretty bowties of homemade farfalle and tubes of rigatoni and paccheri!)
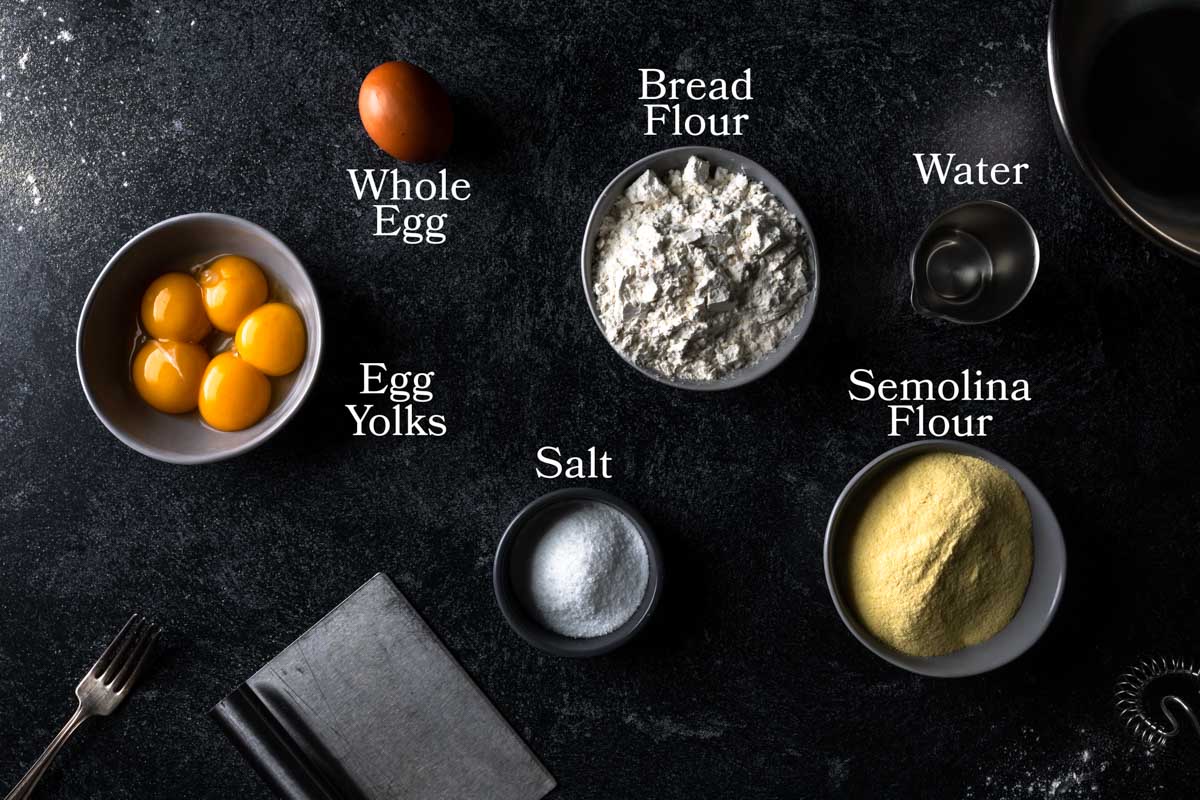
Ingredients for Homemade Pasta Dough
Our recipe for fresh pasta dough uses egg yolks, one whole egg, semolina and bread (or all-purpose) flour. It's simple to make and creates a rich, silky textured pasta.
How To Make Homemade Pasta
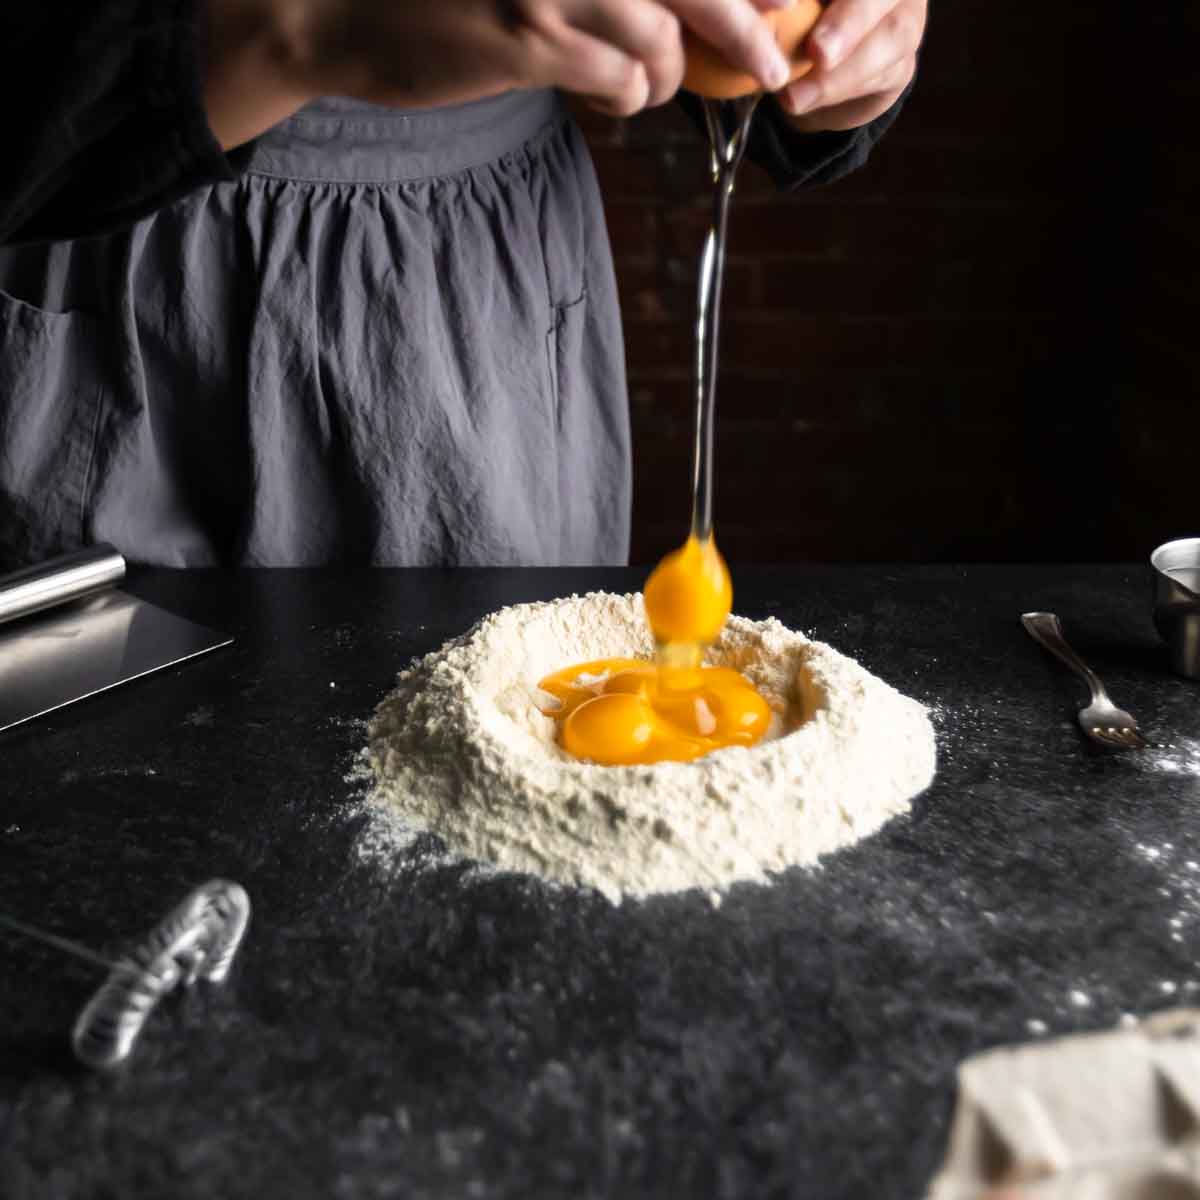
- Sift or whisk flours together and mound them onto a clean work surface. With your hand, make a well in the center of the flour.
- Add egg yolks and one whole egg into the center of the well. Then, add a little water. Start with about one tablespoon of water and increase the water content, as needed.
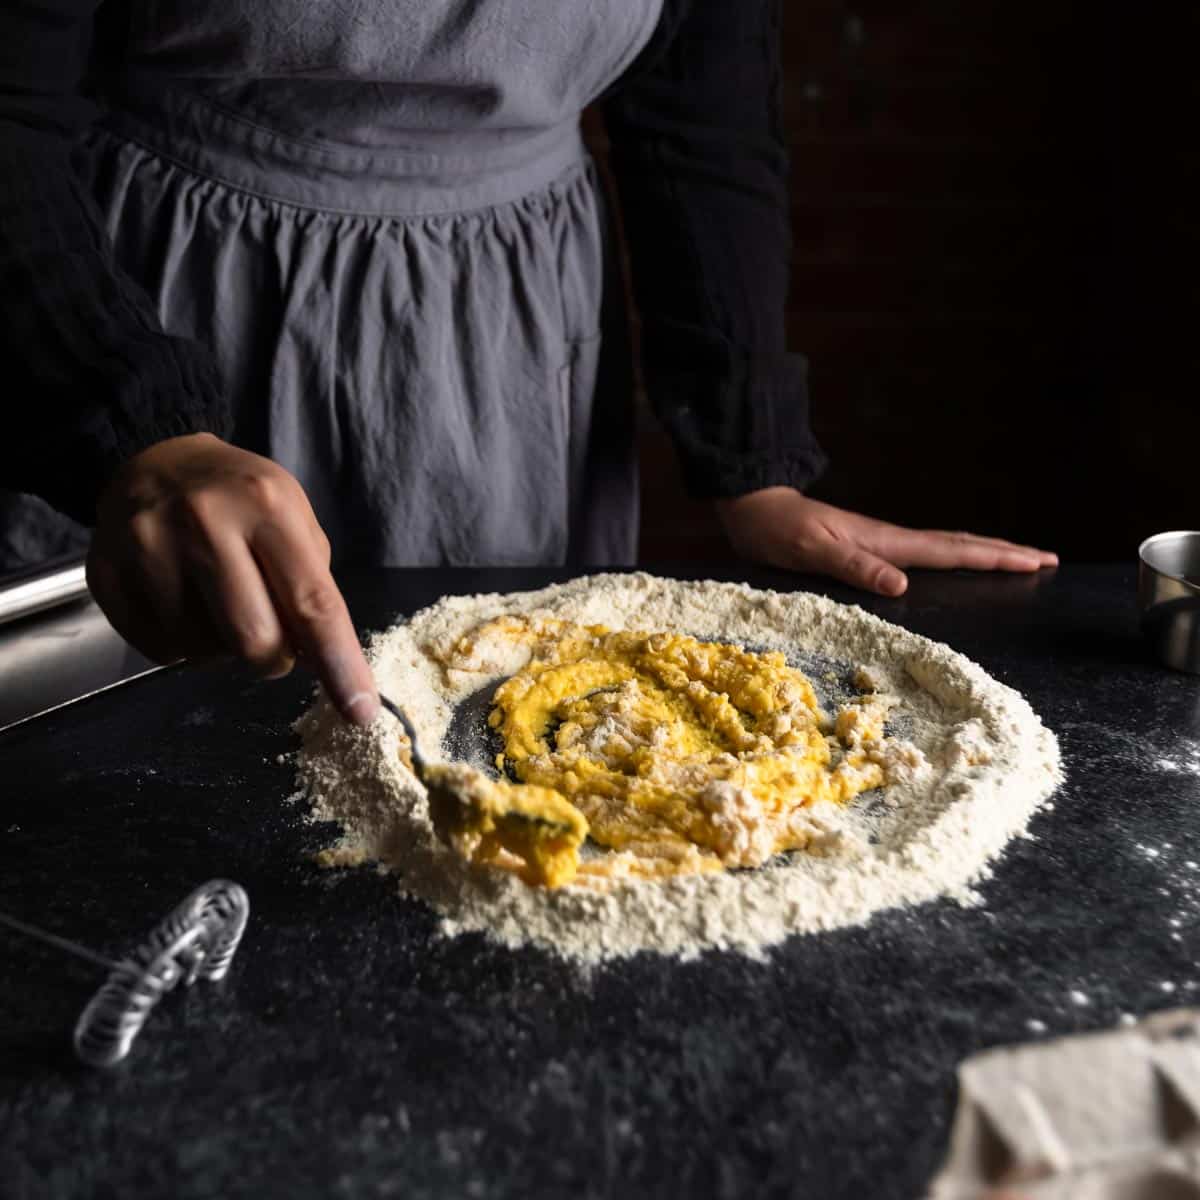
- Use a fork to whisk the water and egg mixture in a circular motion. Once combined, slowly start whisking flour into the center of the well. Continue to pull flour from the edges of the well into the center. A thick, paste-like dough will begin to form.

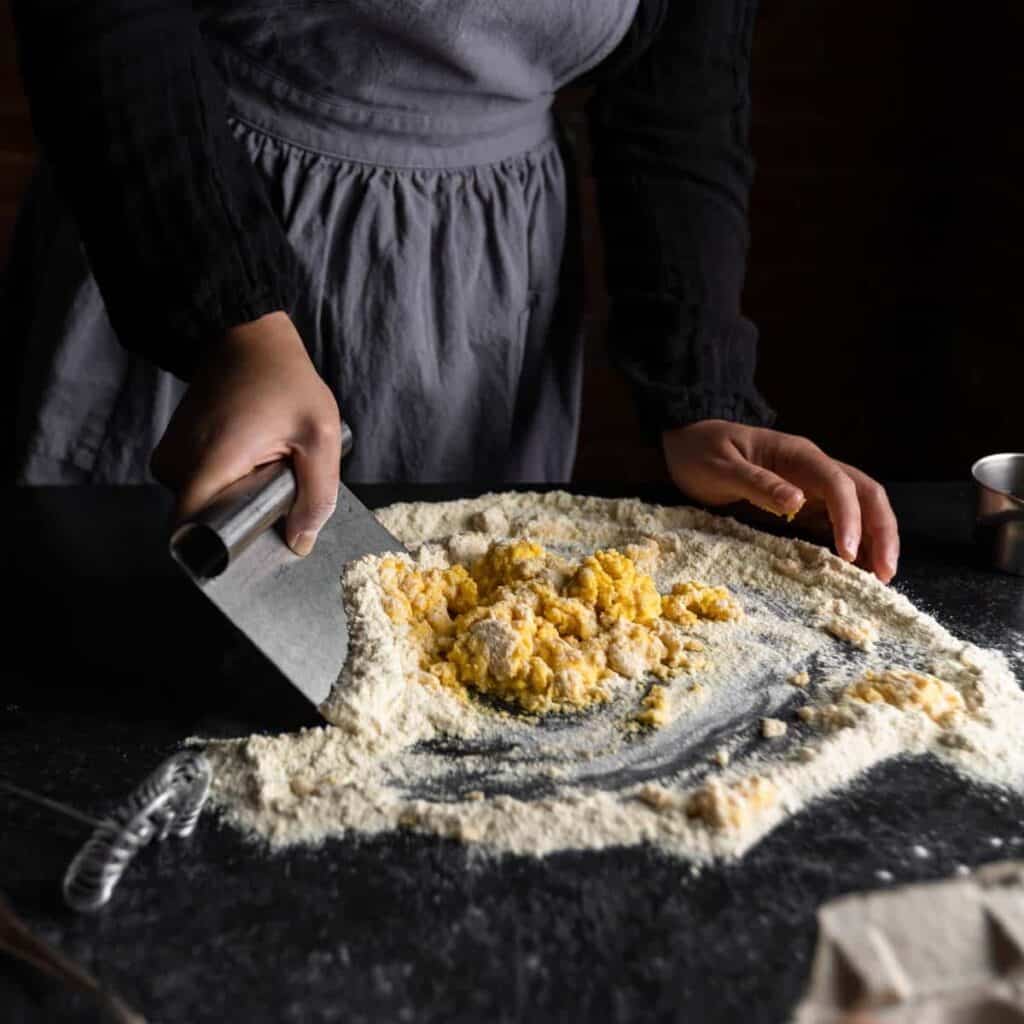
- Once most of the pasta flour is incorporated and the dough begins to come together, switch from using the fork to the bench scraper. Scrape the dough up from your work surface and fold it over itself. Use the bench scraper to evenly distribute the flour throughout the shaggy dough.
Chef's Note: Properly Hydrated Pasta - The total amount of water you will need will vary from batch to batch depending on many factors including your specific brands of flour, your eggs, and the humidity of your own kitchen.
If the dough is too dry to come together, drizzle a little additional water and continue to combine with the bench scraper. You want to have a dough that is easily pliable, but not sticky. If sticky, the dough has too much excess moisture and a little additional flour can be added.
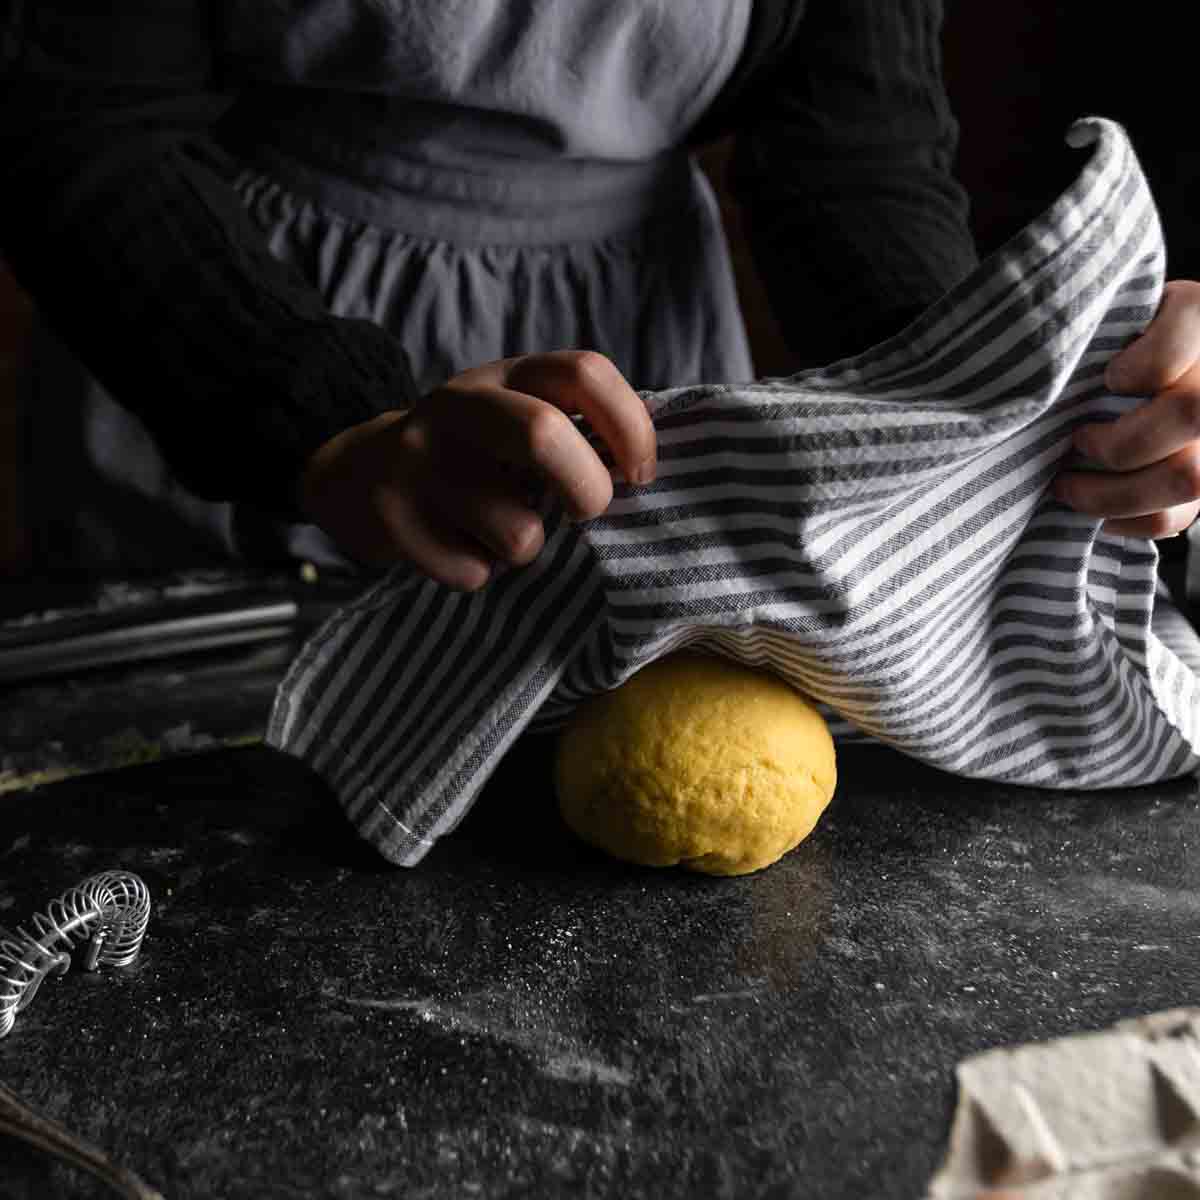
- With your hands pull the dough together and use the mass of dough to pick up any stray scraps of dough or loose flour on your work surface. Knead briefly until the dough is cohesive and shape into a ball. Allow the ball of dough to rest, covered in plastic or a damp towel until ready to be shaped.
Check out the entire post for all of our best tips, tricks and advice for making fresh Italian pasta at home:
Homemade Semolina Pasta Dough
(How To Make Fresh Pasta)
Follow the link for our scratch pasta recipe and guide with Step-by-Step instructions, best practices and How To videos!
Rolling Fettuccine Pasta by Hand
Homemade Fettuccine is on of the easiest pasta shapes to achieve without the use of any special equipment. To make fettuccine by hand all you need is fresh pasta dough, a rolling pin and a sharp knife. The most important step of making homemade fettuccine by hand is rolling your dough thinly and consistently.
Sheeting the Dough with a Rolling Pin
For the best results, we recommend sheeting your pasta dough to 1 millimeter thickness (about the thickness of a standard ID or credit card). I like to use a small, handheld rolling pin because it is easy to work with. However, a standard rolling pin (or even a sideways wine bottle) can work just as well.
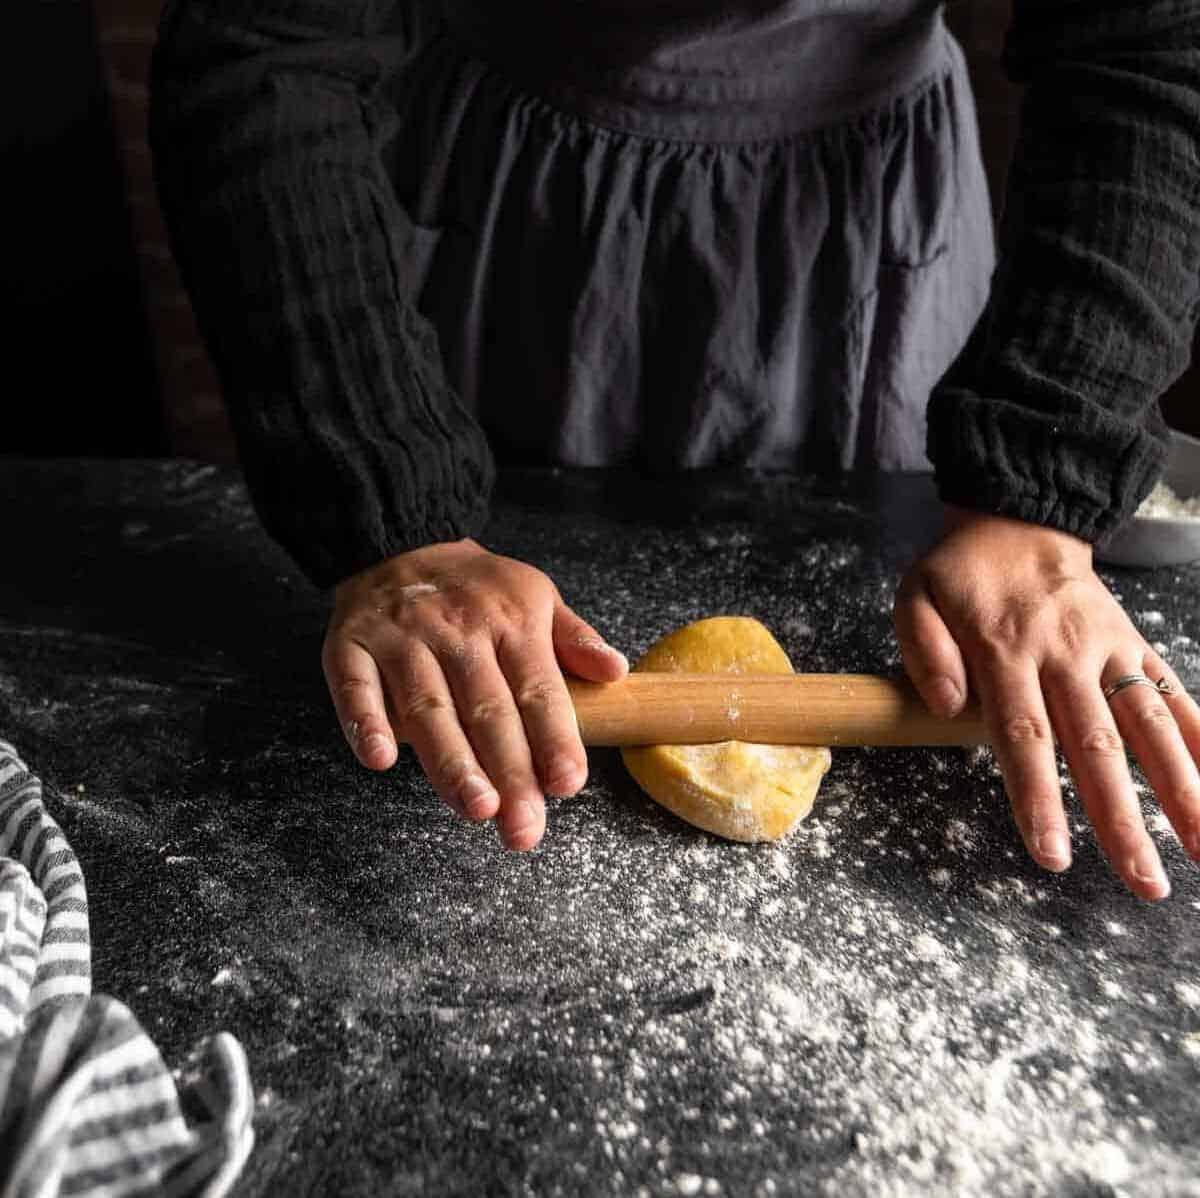
- To sheet the pasta dough by hand start with one-sixth of the pasta dough. Roll the dough into a thick, elongated oval.
- Then, fold the oval over-itself, like a letter. Folding the dough this way helps to create pasta with a classic chewy texture. Use a rolling pin to flatten the folds.
- Repeat this process 2 - 3 times to develop gluten and shape the dough into a smooth-sided rectangle. To help keep the rectangular shape, occasionally roll outwards towards the doughs' corners.
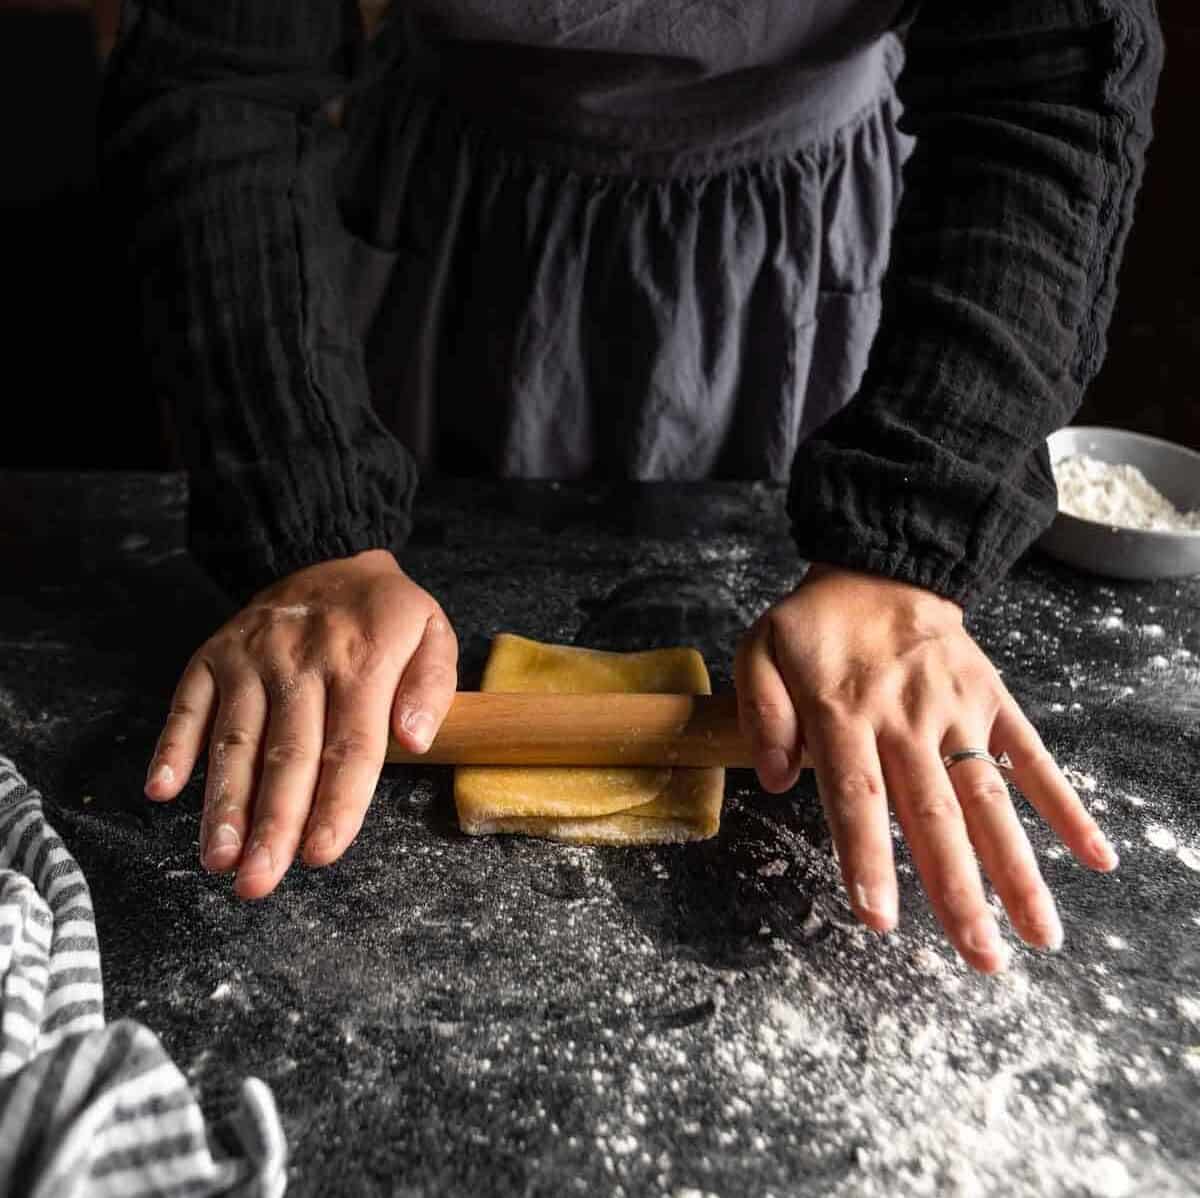
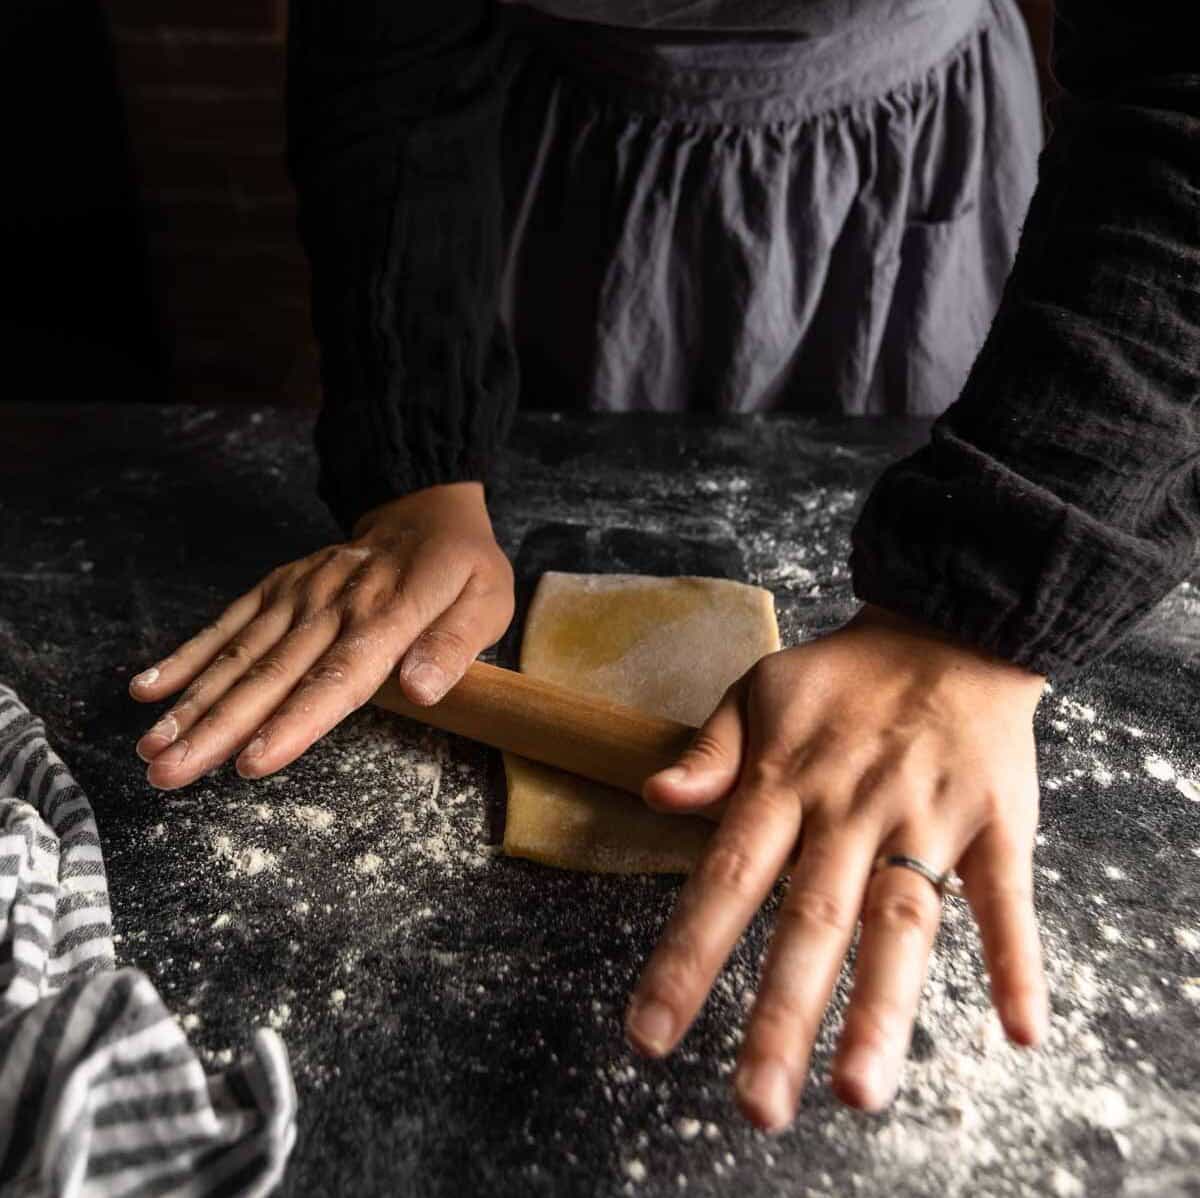
- Use a rolling pin to continue to thin the rectangle of dough.
Chef's Note: If the pasta dough begins to shrink or resists rolling, allow the dough to rest under a damp kitchen towel for about ten minutes. This resting period will relax the dough's gluten and allow you to continue to thin and lengthen the dough more effectively.
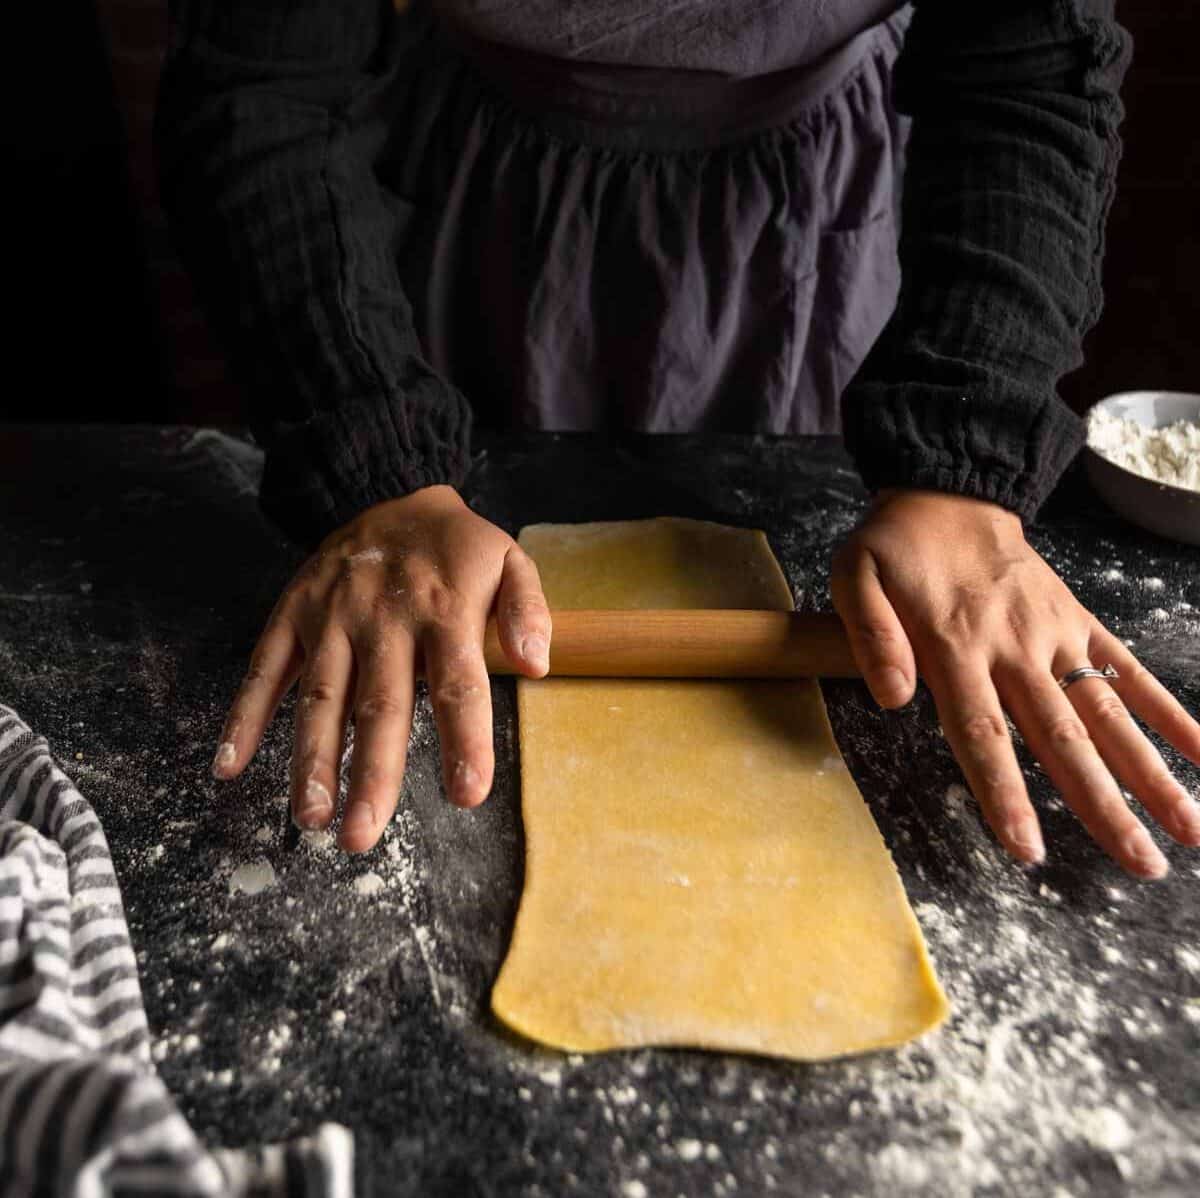
- Continually roll the pin away from you in a single direction to create a long, thin rectangle of dough.
- The thickness of the pasta is up to you, but try to keep the dough thin enough to be translucent and about about the thickness of a credit card (1 millimeter).
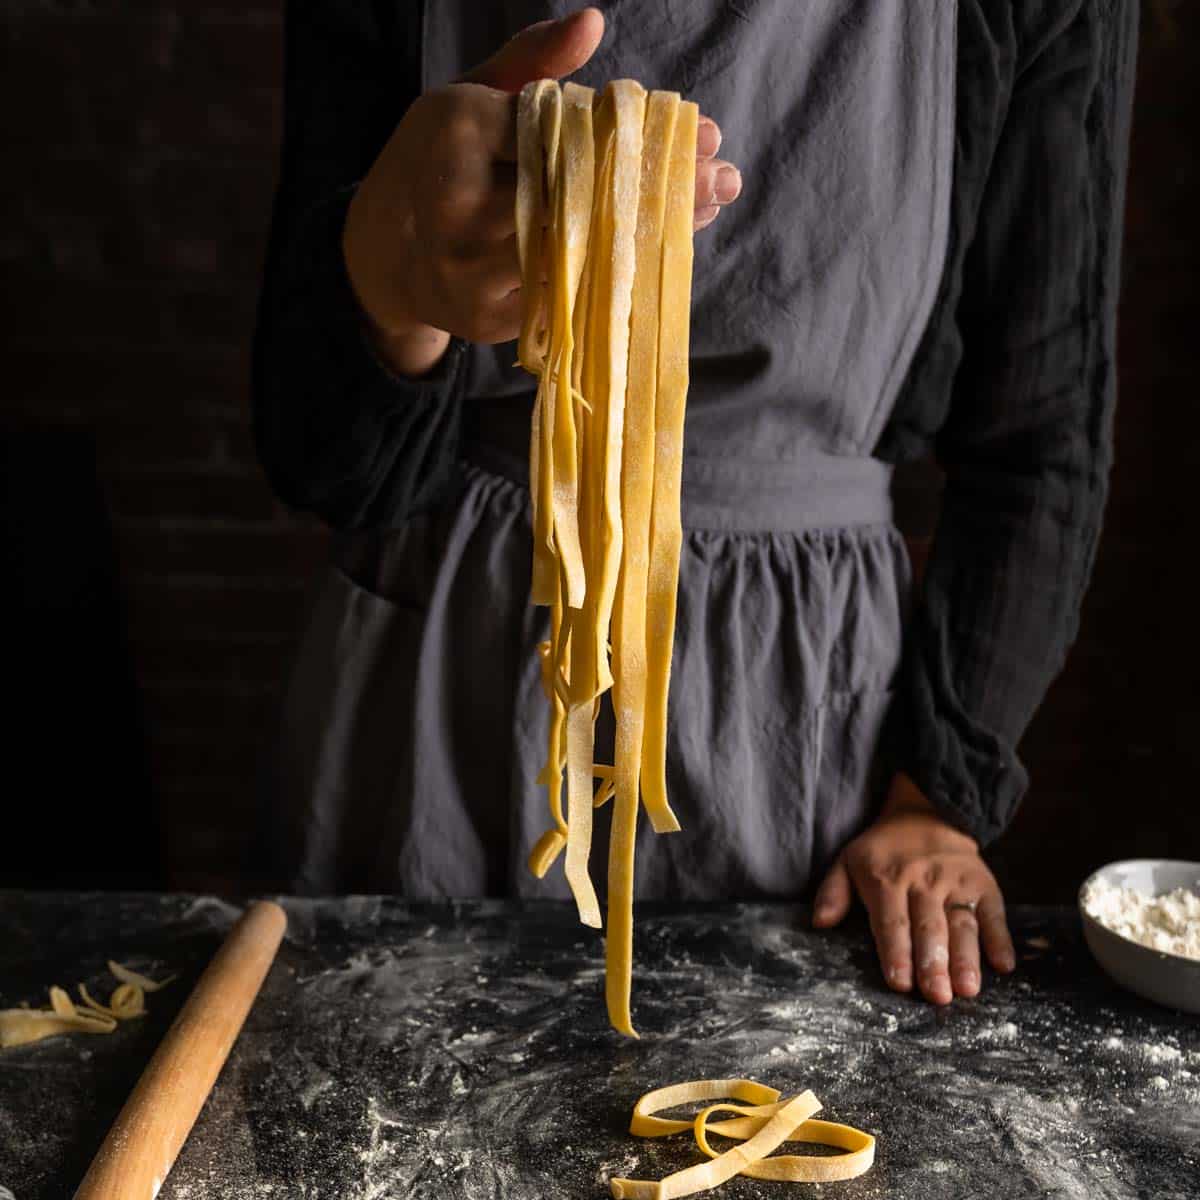
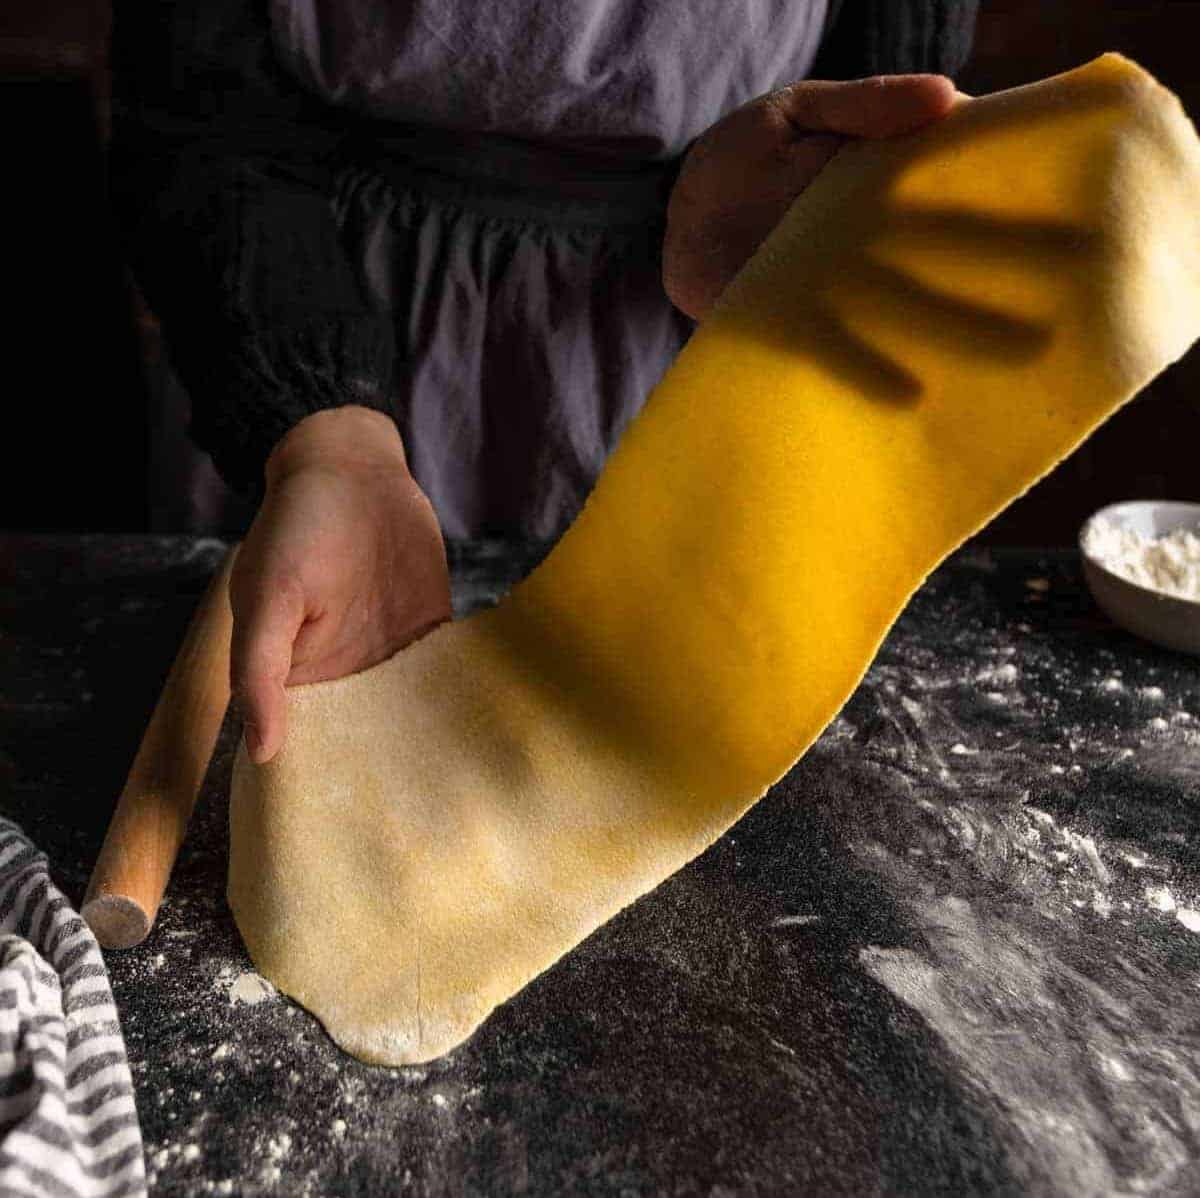
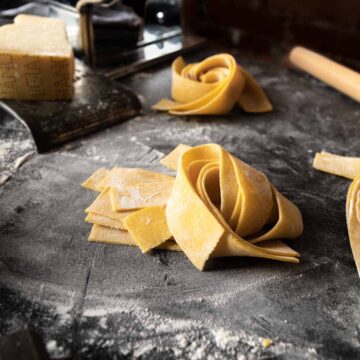
Hand Cut Noodles
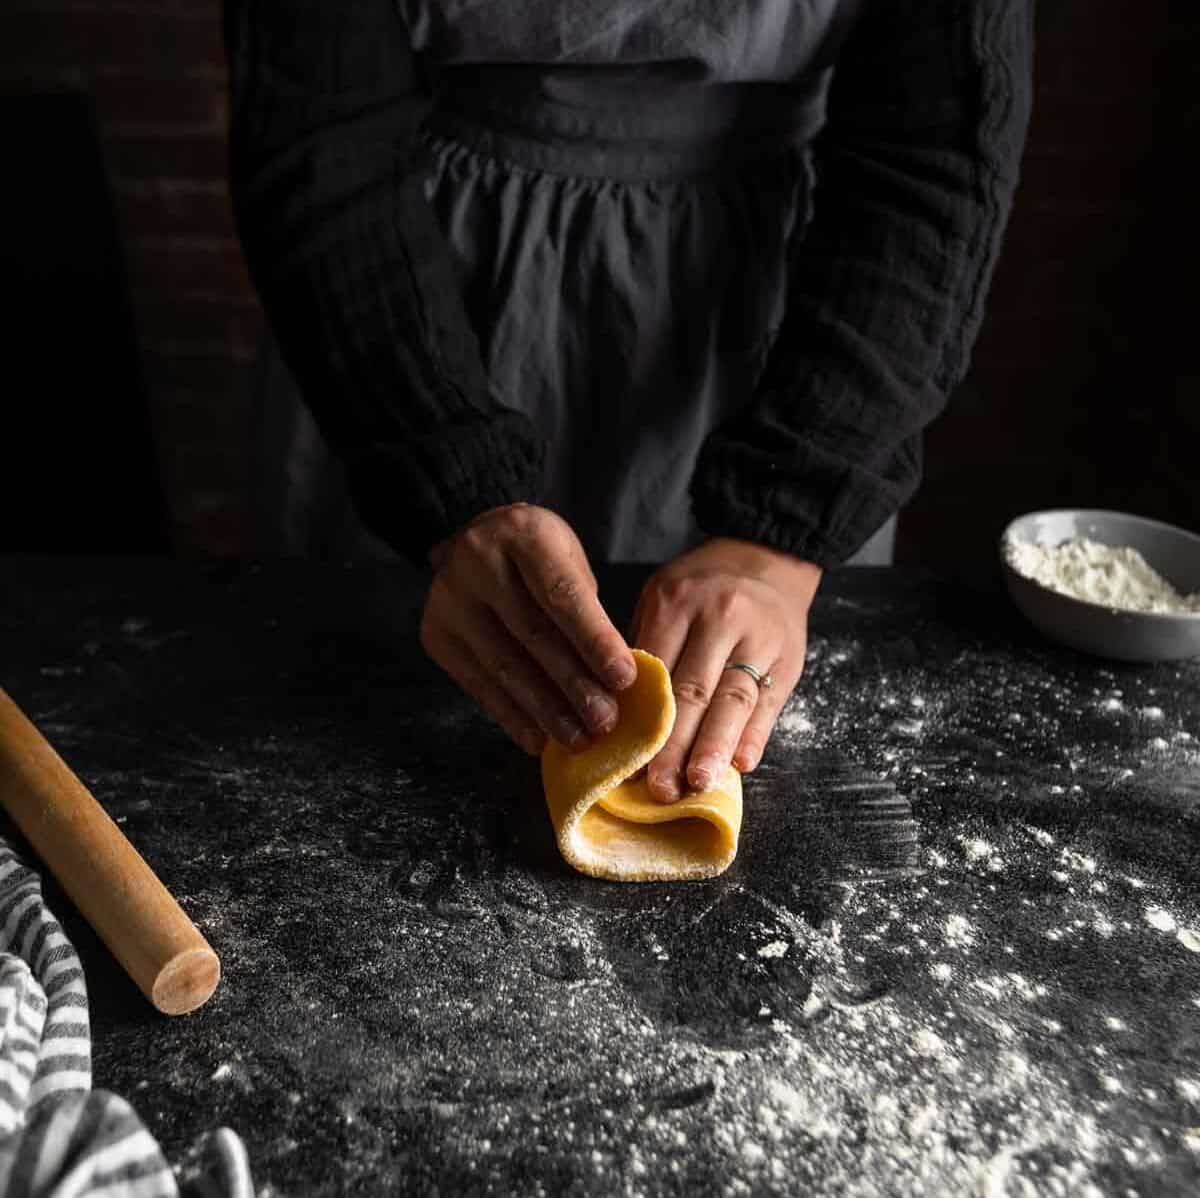
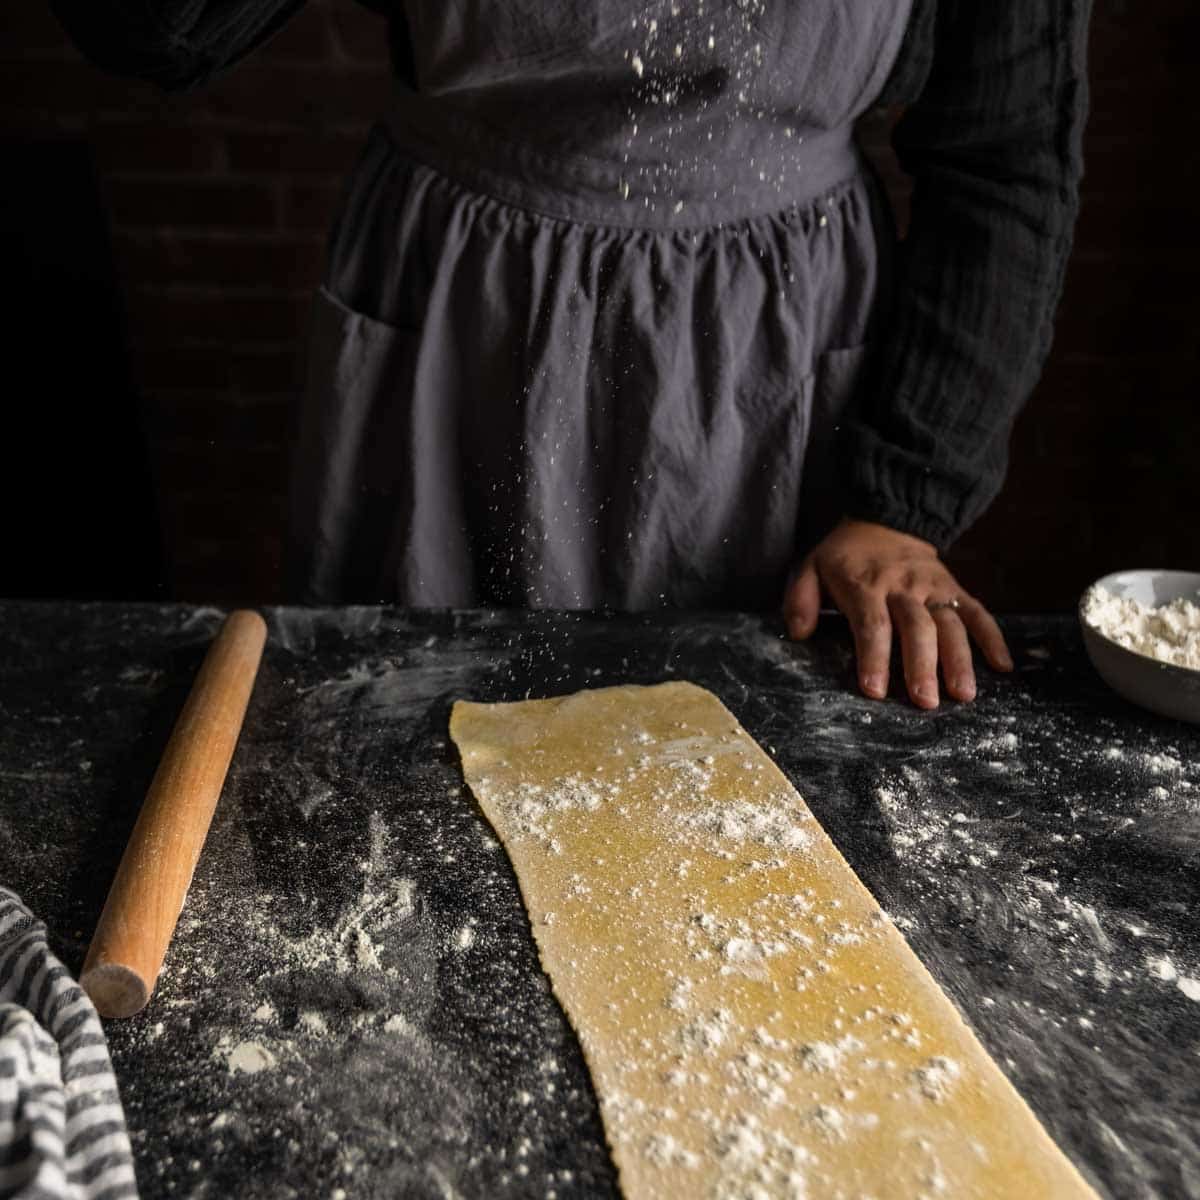
Once the pasta dough is sheeted, it is time to cut the pasta into ribbons of fettuccine noodles. To do this, first make sure your dough is well-floured and will not stick together. Homemade fettuccine is best made from a dry dough that is not tacky or overly moist.
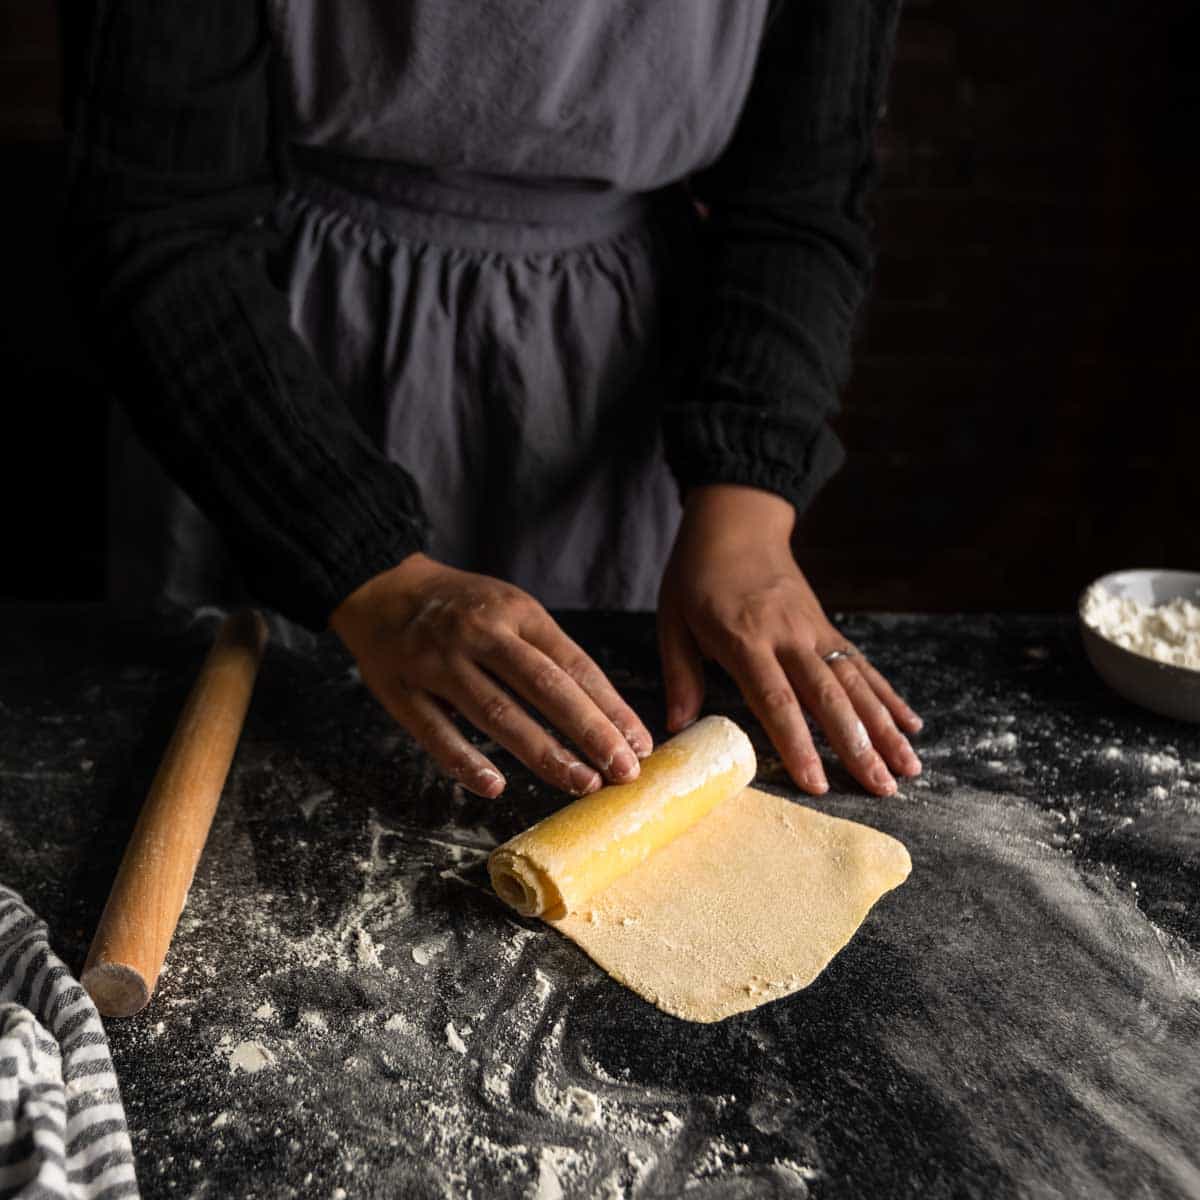
- Starting with the dough's short end, roll the dough into a loose spiral, as you would a cinnamon roll.
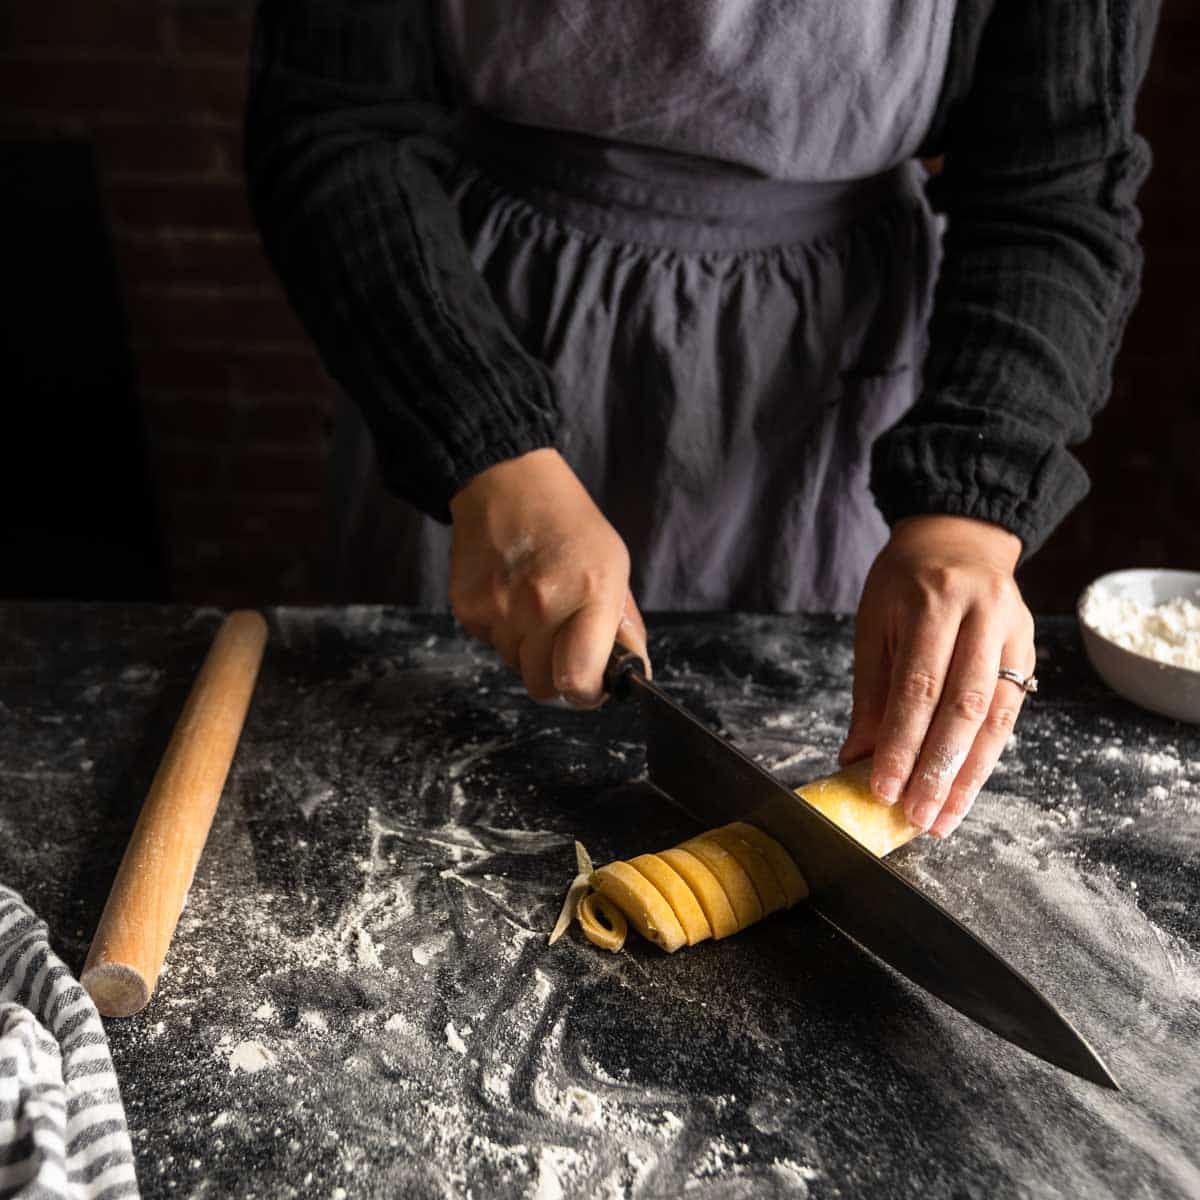
- Once rolled, use a sharp knife to slice the spirals of dough about ¼ inch (6.5 millimeters) wide. You can use a ruler for consistency, but I usually just estimate.
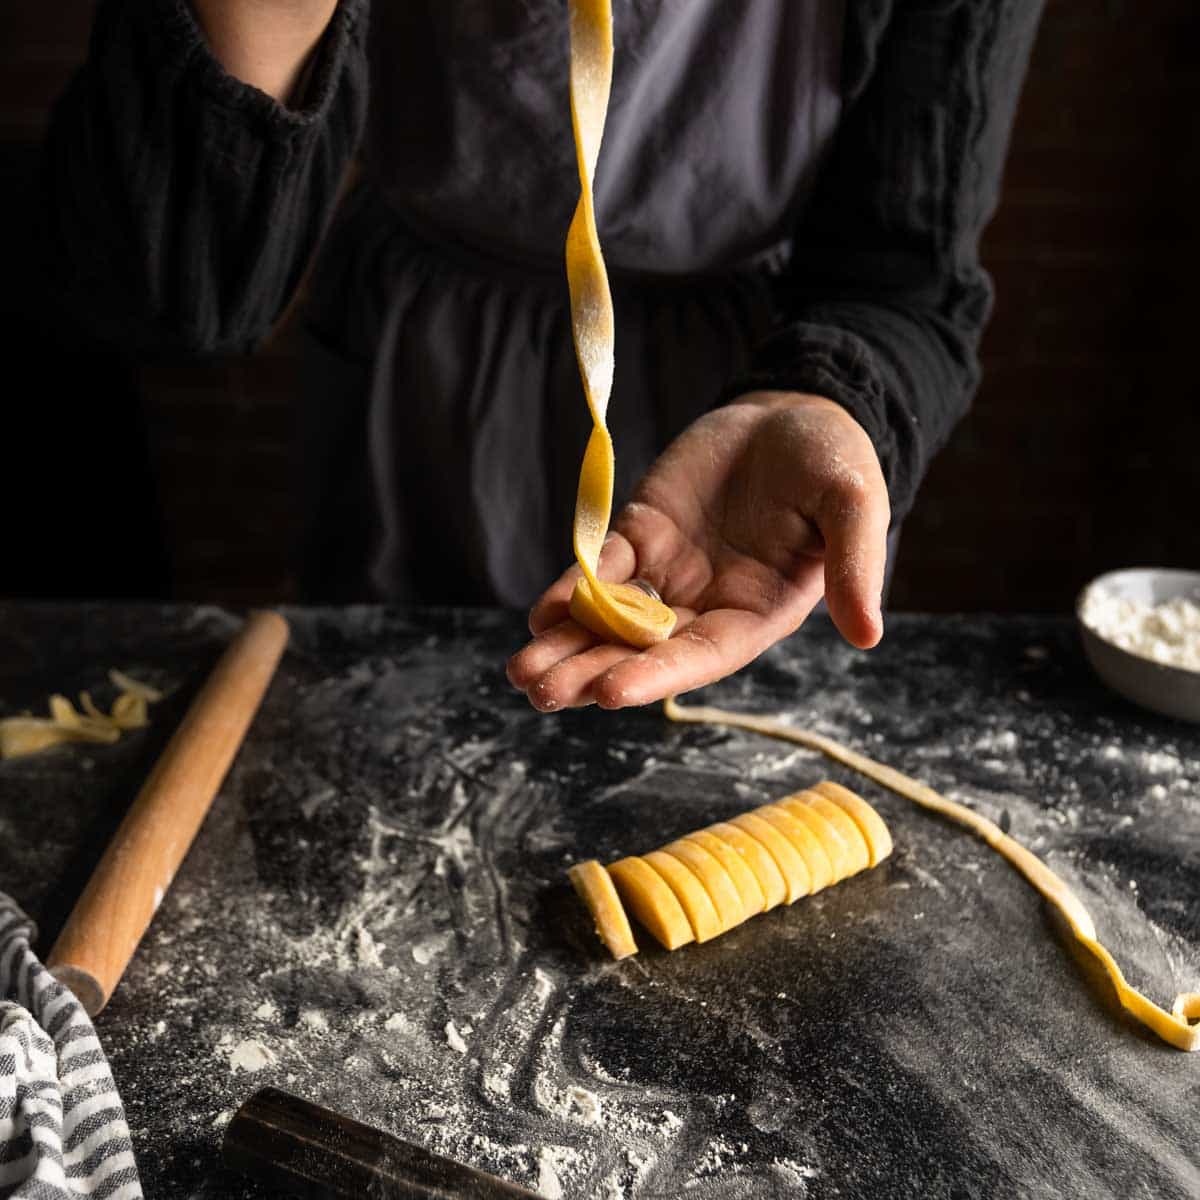
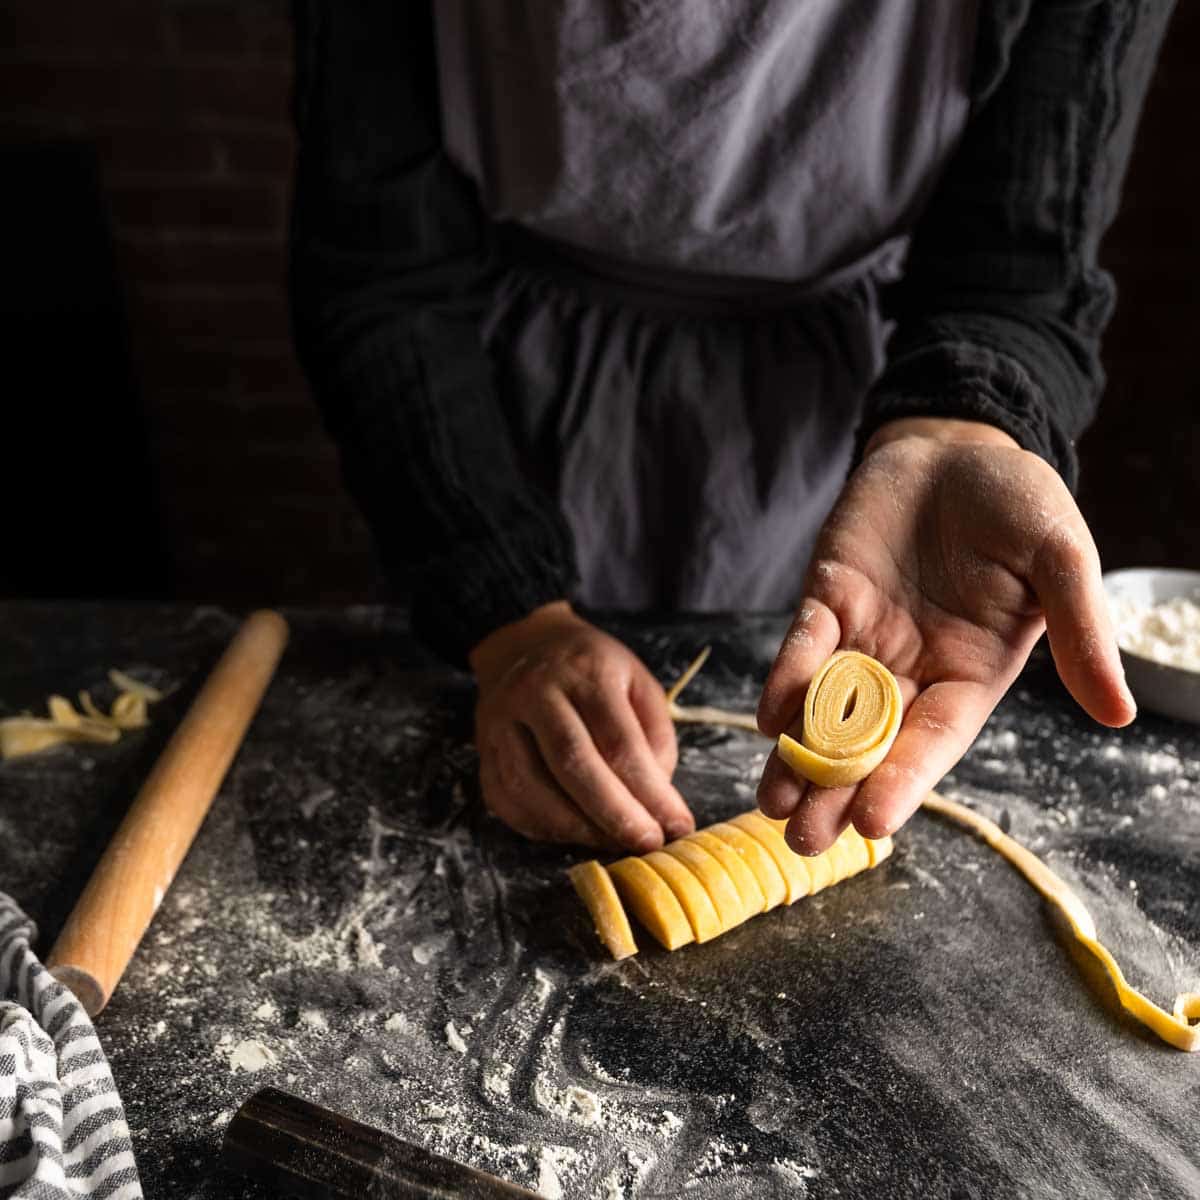
- Once your fettuccine ribbons have been sliced, use your hands to gently unroll each spiral into a long, golden fettuccine noodle. If the freshly cut edges are tacky, toss the hand-cut noodles in a little additional flour before hanging or laying to dry.
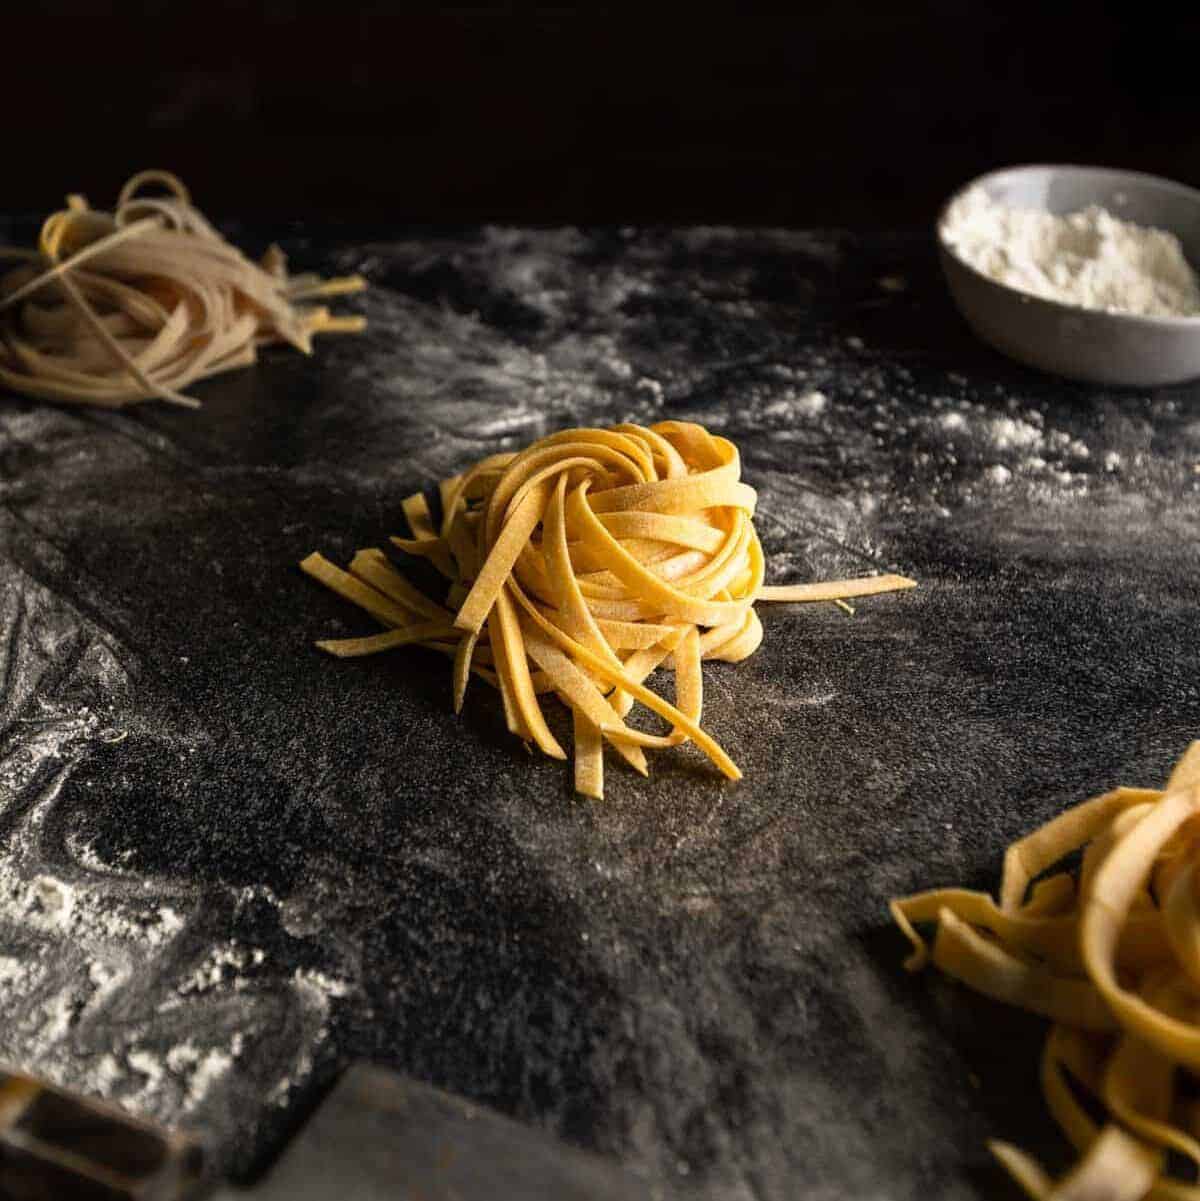
- If you'd like to portion the pasta, flour well and wrap around your hand to shape into little nests.
Making Fettuccine with a Machine
If you have a pasta machine with a fettuccine attachment, Homemade Fettuccine pasta is one of the quick and easiest shapes you can make. Start by sheeting the pasta dough to the thickness of a credit card, about 1 millimeter.
This thickness setting will vary depending on which pasta machine you use. For example, on an Atlas 150 Marcato machine (the one we use), this is the setting labeled '6'. With the Kitchenaide pasta attachment, this thickness is achieved on setting '5'.
Once the pasta is rolled to about a millimeter thickness, the dough can be cut into fettuccine ribbons. Attach your pasta machine's fettuccine cuter and run the sheeted dough through the attachment. The long, glorious noodles can be hung or laid to dry on a pasta drying rack, mesh pasta screen or floured baking sheet.
How & Why To Dry Your Pasta
Fresh pasta is best served after a brief drying time. During the drying process, the fettuccine noodles will become porous and better absorb the flavors of whatever sauce you are serving. Special equipment like pasta drying racks and mesh screens are available, but not necessary.
To dry your Homemade Fettuccine at home you can lay the cut noodles on a lightly floured baking sheet. Alternatively, you can hang noodles on a clothing hanger. When I am making a lot of fresh fettuccine, I have noodles hanging from clothing hangers dangling from my kitchen cupboards. I like to think this method would be approved in the rustic Italian kitchen's of the innovative pasta grannies' I so aspire to.
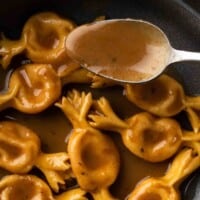
Boiling & Saucing Your Little Ribbons
Fresh pasta boils much faster than dried and boxed pasta varieties. To cook Homemade Fettuccine, bring a large pot of water to a rolling boil. Generously salt the boiling water to season the pasta. Fresh fettuccine will need to cook for about 2 - 5 minutes, or until al dente. The exact cooking time will depend on how thick and dry your fettuccine is.
For the best results, taste a noodle to test for desired doneness. Once cooked, we recommend using a spider utensil to transfer the fettuccine directly into your pasta sauce. Finishing the pasta directly in the sauce will help the starches bind and create a full-flavored, deliciously saucy pasta.
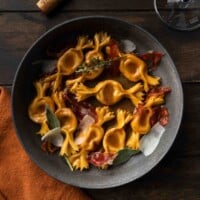
Serving Suggestions
Homemade Fettuccine pasta has endless opportunities for deliciousness! Here are a few of our favorite serving suggestions:
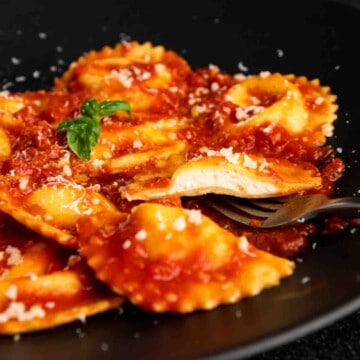
- Tomato Sauce - For a simple Italian classic, pair your fresh fettuccine with our San Marzano Tomato Sauce.
- Fettuccine Alfredo - This dish is a beloved classic! Try our favorite variation: Sun-Dried Tomato Alfredo with Chicken
- Bolognese, Ragu or Amatriciana - These little ribbons are perfect for adorning in a hearty meat sauce! Try our Ragu alla Bolognese recipe!
- Noodle Soup - Homemade Fettuccine can be cooked directly in broth based soups just before serving! Chicken noodle soup is so much better when made with fresh pasta!
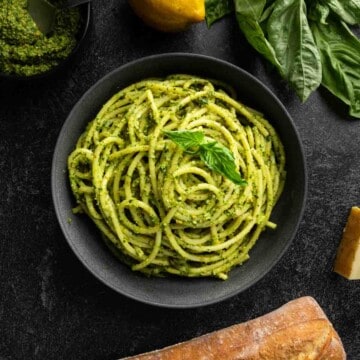
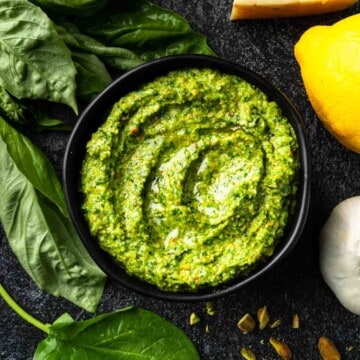
- Pesto - Fettuccine in our Spinach Pistachio Pesto makes for the perfect side dish or vegetarian entree!
- With Proteins - Serve fettuccine in your favorite sauce with chicken, salmon, sausage, steak or meatballs. Fettuccine is a perfect pairing with our 30 Minute Chicken Marsala Meatballs
Frequently Asked Questions
Fettuccine pasta can be made from semolina, all-purpose or 00 flour.
Dried store-bought fettuccine is often made from the shelf stable pasta of semolina and water. Fresh fettuccine is often made from egg based doughs using 00 or all purpose flours.
This recipe utilizes a multi-purpose dough using semolina flour, all purpose flour and eggs. The result is a rich and silky pasta with a hearty texture and toothsome chew.
Fettuccine can be hung from clothing hangers to dry at room temperature for up to two hours. For longer drying times, I recommend drying fettuccine noodles in the refrigerator. Lay the fettuccine in single layer on a well-floured sheet pan, covered with a clean kitchen towel.
Once dried, fettuccine can be frozen to help preserve color and freshness.
Fresh fettuccine should be boiled in ample salted water for 3 -5 minutes until al dente. The exact cooking time will vary depending on how thick and dry the pasta is. For the best results, I recommend tasting a noodle to check for your desired doneness.
More Pasta Recipes
Check out our other fun pasta shape tutorials and yummy recipes!
Recipe

How To Make Homemade Fettuccine (By Hand or Machine)
ADJUST SERVINGS
Special Equipment
- Bench Scraper
- Ruler (optional)
- Pasta Machine with Fettuccine Attachement (optional)
- Spider Kitchen Utensil (or Colander), for draining
- Pasta Drying Rack or Mesh Pasta Drying Screen (optional)
Ingredients
1 Pound (454 grams) Fresh Pasta Dough (We use this, Semolina Pasta Dough Recipe, See the full post, here.)
- 1¼ Cups semolina flour
- 1¼ Cups bread flour or all-purpose flour plus more to prevent sticking
- 1 large whole egg room-temperature
- 5 large egg yolks room-temperature
- Water as needed, about 2+ Tablespoons
- fine kosher salt* as desired, for seasoning during boil
Instructions
Fresh Pasta Dough
- If using our Homemade Semolina Pasta Dough recipe, gather, measure and prepare the recipe ingredients as listed. For the most consistent results, we recommend using metric weight measurements whenever possible.
- In a medium mixing bowl, add semolina and bread flours and whisk to combine. Transfer flour mixture in a mound on a smooth, clean work surface. Shape a well in the center of your flour.
- Add the egg, egg yolks and about 1 Tablespoon (15 milliliters) of water to the well.
- Using a fork, begin to whisk the eggs and water together until smoothly combined. Continue whisking, while slowly bringing flour into the eggs to form a smooth paste.
- Once most of the pasta flour is incorporated and the dough begins to come together, switch from using the fork to using your bench scraper. Scrape the dough up from your work surface and fold it over itself. Use the bench scraper to chop the mixture together and evenly distribute the flour throughout a shaggy dough. If the dough is too dry to come together, drizzle a little additional water over the mass of dough and continue to combine with the bench scraper.
- Use your hands to pull the dough together and knead. Use the mass of dough to pick up any scraggly dough scraps or loose flour on your work surface. The dough should be firm and may be slighlty tacky but should not stick to your hands or the work surface.
- Once all the flour is incorporated and dough is homogenous, form into a ball. Cover the dough with a damp towel or plastic wrap to prevent drying. Allow the dough to rest for at least 30 minutes or overnight in the refrigerator. Once rested, you can begin sheeting your pasta to make homemade fettuccine.
How To Shape Homemade Fettuccine Pasta (By Hand or Machine)
- Using a knife or bench scraper, divide your fresh pasta dough into four equal portions. Work with one portion at a time, keep the remaining dough covered with your damp cloth or plastic wrap to prevent drying.
- Flour your dough, work surface and kitchen tools as needed, to prevent sticking. With a rolling pin, or on the widest setting of your pasta maker, begin to roll out and flatten your dough into an elongated oval. Fold the tapered ends of your oval dough over itself, in thirds (like you would a letter) so your folded dough is approximately the shape of a 13 centimeter (5 inch) square or rectangle (*or the width of your pasta maker, if using).
- Repeat Step 2 twice, for a total of three folds. If your dough seems too moist and is sticking, you can fold in a little extra flour during this process.
- Sheet pasta with a rolling pin or pasta maker to 1 millimeter thick (about the width of a credit card or about 1/32 of an inch ).
- By Hand: Lightly flour the sheeted pasta dough to prevent sticking. Starting at the short end, roll the dough into a loose log, like a cinnamon roll. With a sharp knife, slice the log of dough into noodles about ¼ inch (6.5 millimeters) wide. Use a ruler, for consistency, if desired. Once sliced, immediately unroll each fettuccine ribbon and toss in a little additional flour, if at all moist or sticking.By Machine: Connect the fettuccine attachment to your pasta maker. Lightly flour the sheeted pasta dough to prevent sticking. Run your sheeted pasta dough through the fettuccine attacment. Gently seperate the noodles and toss in additional flour, if at all moist or sticking.
- Allow the shaped fettuccine pasta to dry on a pasta drying rack, floured sheet pan or mesh pasta screen. If using at a later date, fettucccine can be shaped into portioned nests for drying. (If making nests, be sure to toss ribbons in addditioanal flour to prevent sticking.) Dried fettuccine can be boiled immediately or kept in a paper bag in a cool, dry place for up to one week.
How To Cook Homemade Fettuccine Pasta
- Bring 4 – 6 quarts (4 – 6 liters) of water to a rolling boil. Season the water with salt, as desired. (We typically use about 2 – 3 Tablespoons of salt).
- Add fettuccine pasta to the pot and cook for about 2 - 5 minutes or until al dente. The exact cooking time will depend on the thickness and dryness of your pasta. We recommend tasting a piece of fettuccine to determine the ideal doneness.
- Transfer the cooked pasta from the boiling water directly into your sauce using a spider utensil (or drain pasta using a colander). Enjoy Homamade Fettuccine immediately with your favorite sauce and cheeses, quanto basta (as desired). Enjoy!
Video
Notes
* A Note About Salt
Unless otherwise noted, all recipes on The Sage Apron are developed using Diamond Crystal Kosher salt. It is a great all-purpose salt for cooking and baking. If using table salt, reduce quantities by about half.
Ines Di Lelio says
HISTORY OF ALFREDO DI LELIO CREATOR IN 1908 OF “FETTUCCINE ALL’ALFREDO” (“FETTUCCINE ALFREDO”), NOW SERVED BY HIS NEPHEW INES DI LELIO, AT THE RESTAURANT “IL VERO ALFREDO” – “ALFREDO DI ROMA” IN ROME, PIAZZA AUGUSTO IMPERATORE 30
With reference to your article I have the pleasure to tell you the history of my grandfather Alfredo Di Lelio, who is the creator of “Fettuccine all’Alfredo” (“Fettuccine Alfredo”) in 1908 in the “trattoria” run by his mother Angelina in Rome, Piazza Rosa (Piazza disappeared in 1910 following the construction of the Galleria Colonna / Sordi). This “trattoria” of Piazza Rosa has become the “birthplace of fettuccine all’Alfredo”.
More specifically, as is well known to many people who love the “fettuccine all’Alfredo", this famous dish in the world was invented by Alfredo Di Lelio concerned about the lack of appetite of his wife Ines, who was pregnant with my father Armando (born February 26, 1908).
Alfredo di Lelio opened his restaurant “Alfredo” in 1914 in Rome and in 1943, during the war, he sold the restaurant to others outside his family.
In 1950 Alfredo Di Lelio decided to reopen with his son Armando his restaurant in Piazza Augusto Imperatore n.30 "Il Vero Alfredo" (“Alfredo di Roma”), whose fame in the world has been strengthened by his nephew Alfredo and that now managed by me, with the famous “gold cutlery” (fork and spoon gold) donated in 1927 by two well-known American actors Mary Pickford and Douglas Fairbanks (in gratitude for the hospitality).
See the website of “Il Vero Alfredo”.
I must clarify that other restaurants "Alfredo" in Rome do not belong and are out of my brand "Il Vero Alfredo – Alfredo di Roma".
The brand "Il Vero Alfredo - Alfredo di Roma" is present in Mexico with a restaurant in Mexico City and a trattoria in Cozumel) on the basis of franchising relationships with the Group Hotel Presidente Intercontinental Mexico.
The restaurant “Il Vero Alfredo” is in the Registry of “Historic Shops of Excellence - section on Historical Activities of Excellence” of the Municipality of Roma Capitale.
Best regards Ines Di Lelio
IN ITALIANO
STORIA DI ALFREDO DI LELIO, CREATORE DELLE “FETTUCCINE ALL’ALFREDO” (“FETTUCCINE ALFREDO”), E DELLA SUA TRADIZIONE FAMILIARE PRESSO IL RISTORANTE “IL VERO ALFREDO” (“ALFREDO DI ROMA”) IN PIAZZA AUGUSTO IMPERATORE A ROMA
Con riferimento al Vostro articolo ho il piacere di raccontarVi la storia di mio nonno Alfredo Di Lelio, inventore delle note "fettuccine all'Alfredo" (“Fettuccine Alfredo”).
Alfredo Di Lelio, nato nel settembre del 1883 a Roma in Vicolo di Santa Maria in Trastevere, cominciò a lavorare fin da ragazzo nella piccola trattoria aperta da sua madre Angelina in Piazza Rosa, un piccolo slargo (scomparso intorno al 1910) che esisteva prima della costruzione della Galleria Colonna (ora Galleria Sordi).
Il 1908 fu un anno indimenticabile per Alfredo Di Lelio: nacque, infatti, suo figlio Armando e videro contemporaneamente la luce in tale trattoria di Piazza Rosa le sue “fettuccine”, divenute poi famose in tutto il mondo. Questa trattoria è “the birthplace of fettuccine all’Alfredo”.
Alfredo Di Lelio inventò le sue “fettuccine” per dare un ricostituente naturale, a base di burro e parmigiano, a sua moglie (e mia nonna) Ines, prostrata in seguito al parto del suo primogenito (mio padre Armando). Il piatto delle “fettuccine” fu un successo familiare prima ancora di diventare il piatto che rese noto e popolare Alfredo Di Lelio, personaggio con “i baffi all’Umberto” ed i calli alle mani a forza di mischiare le sue “fettuccine” davanti ai clienti sempre più numerosi.
Nel 1914, a seguito della chiusura di detta trattoria per la scomparsa di Piazza Rosa dovuta alla costruzione della Galleria Colonna, Alfredo Di Lelio decise di aprire a Roma il suo ristorante “Alfredo” che gestì fino al 1943, per poi cedere l’attività a terzi estranei alla sua famiglia.
Ma l’assenza dalla scena gastronomica di Alfredo Di Lelio fu del tutto transitoria. Infatti nel 1950 riprese il controllo della sua tradizione familiare ed aprì, insieme al figlio Armando, il ristorante “Il Vero Alfredo” (noto all’estero anche come “Alfredo di Roma”) in Piazza Augusto Imperatore n.30 (cfr. il sito web di Il Vero Alfredo).
Con l’avvio del nuovo ristorante Alfredo Di Lelio ottenne un forte successo di pubblico e di clienti negli anni della “dolce vita”. Successo, che, tuttora, richiama nel ristorante un flusso continuo di turisti da ogni parte del mondo per assaggiare le famose “fettuccine all’Alfredo” al doppio burro da me servite, con
l’impegno di continuare nel tempo la tradizione familiare dei miei cari maestri, nonno Alfredo, mio padre Armando e mio fratello Alfredo. In particolare le fettuccine sono servite ai clienti con 2 “posate d’oro”: una forchetta ed un cucchiaio d’oro regalati nel 1927 ad Alfredo dai due noti attori americani M. Pickford e D. Fairbanks (in segno di gratitudine per l’ospitalità).
Desidero precisare che altri ristoranti “Alfredo” a Roma non appartengono e sono fuori dal mio brand di famiglia.
Il brand “Il Vero Alfredo – Alfredo di Roma” è presente in Messico con un ristorante a Città del Messico e una trattoria a Cozumel sulla base di rapporti di franchising con il Group Hotel Presidente Intercontinental Mexico.
Vi informo che il Ristorante “Il Vero Alfredo” è presente nell’Albo dei “Negozi Storici di Eccellenza – sezione Attività Storiche di Eccellenza” del Comune di Roma Capitale.
Grata per la Vostra attenzione ed ospitalità nel Vostro interessante blog, cordiali saluti
Ines Di Lelio
foodworthfeed says
Such a lovely story! Thank you for sharing!